Ads 468x60px

Pages

Tampilkan postingan dengan label recent. Tampilkan semua postingan

Rabu, 02 Oktober 2013

Show Recent Posts With Thumbnails For Particular Label or Category in Blogger

Sometimes we want to have everything organized so that our readers can find topics of interest more easily, and thats when instead of putting a widget with the latest posts, we can put together the latest entries sorted by category, so that well be able to show the latest posts for each label we want and also display a thumbnail for our category.

recent posts, blogger widgets, blogger gadgets
Screenshot

To add this cool gadget/widget for the latest categories, just follow the next steps:

Steps

Step 1. From your Blogger Dashboard, go to Template/Edit HTML


...then tick the Expand Widget Templates checkbox:

Step 2. Search for this piece of code:

]]></b:skin>

and just above it, paste this one:

/* Recent posts by labels
--------------------------------- */
img.label_thumb{
float:left;
margin-right:10px !important;
height:65px; /* Thumbnail height */
width:65px; /* Thumbnail width */
border: 1px solid #fff;
-webkit-border-radius: 10px;
-moz-border-radius: 10px;
border-radius: 10px;
-webkit-box-shadow: 0 1px 1px rgba(0, 0, 0, .4);
-moz-box-shadow: 0 1px 1px rgba(0, 0, 0, .4);
box-shadow: 0 1px 1px rgba(0, 0, 0, .4);
}

.label_with_thumbs {
float: left;
width: 100%;
min-height: 70px;
margin: 0px 10px 2px 0px;
padding: 0;
}
ul.label_with_thumbs li {
padding:8px 0;
min-height:65px;
margin-bottom:0px;
border-bottom: 1px dotted #999999;
}

.label_with_thumbs li{
list-style: none ;
padding-left:0px !important;
}

.label_with_thumbs a { text-transform: uppercase;}
.label_with_thumbs strong {padding-left:0px; }

Step 3. Now search for this tag (CTRL + F)

</head>

...and add the following script above it:

<script type=text/javascript>
//<![CDATA[
function labelthumbs(json){document.write(<ul class="label_with_thumbs">);for(var i=0;i<numposts;i++){var entry=json.feed.entry[i];var posttitle=entry.title.$t;var posturl;if(i==json.feed.entry.length)break;for(var k=0;k<entry.link.length;k++){if(entry.link[k].rel==replies&&entry.link[k].type==text/html){var commenttext=entry.link[k].title;var commenturl=entry.link[k].href;}
if(entry.link[k].rel==alternate){posturl=entry.link[k].href;break;}}var thumburl;try{thumburl=entry.media$thumbnail.url;}catch(error)
{s=entry.content.$t;a=s.indexOf("<img");b=s.indexOf("src="",a);c=s.indexOf(""",b+5);d=s.substr(b+5,c-b-5);if((a!=-1)&&(b!=-1)&&(c!=-1)&&(d!="")){thumburl=d;}else thumburl=https://blogger.googleusercontent.com/img/b/R29vZ2xl/AVvXsEj6Kzu_z6V9zssKEZsGZuKDfJjdFgRXxWjHe71hsQfp5Xpy3BYwxCy9WK-Pr5dFZpyQ9giTL4dlGHXpJL5smBUgMSjrLPmNgIP88sTZWvIPYpqJcE8bI028-aaFHuS9CEWaP3tqeZxnRoY/s1600/picture_not_available.png;}
var postdate=entry.published.$t;var cdyear=postdate.substring(0,4);var cdmonth=postdate.substring(5,7);var cdday=postdate.substring(8,10);var monthnames=new Array();monthnames[1]="Jan";monthnames[2]="Feb";monthnames[3]="Mar";monthnames[4]="Apr";monthnames[5]="May";monthnames[6]="June";monthnames[7]="July";monthnames[8]="Aug";monthnames[9]="Sept";monthnames[10]="Oct";monthnames[11]="Nov";monthnames[12]="Dec";document.write(<li class="clearfix">);if(showpostthumbnails==true)
document.write(<a href="+posturl+" target ="_top"><img class="label_thumb" src="+thumburl+"/></a>);document.write(<strong><a href="+posturl+" target ="_top">+posttitle+</a></strong><br>);if("content"in entry){var postcontent=entry.content.$t;}
else
if("summary"in entry){var postcontent=entry.summary.$t;}
else var postcontent="";var re=/<S[^>]*>/g;postcontent=postcontent.replace(re,"");if(showpostsummary==true){if(postcontent.length<numchars){document.write();document.write(postcontent);document.write();}
else{document.write();postcontent=postcontent.substring(0,numchars);var quoteEnd=postcontent.lastIndexOf(" ");postcontent=postcontent.substring(0,quoteEnd);document.write(postcontent+...);document.write();}}
var towrite=;var flag=0;document.write(<br>);if(showpostdate==true){towrite=towrite+monthnames[parseInt(cdmonth,10)]+-+cdday+ - +cdyear;flag=1;}
if(showcommentnum==true)
{if(flag==1){towrite=towrite+ | ;}
if(commenttext==1 Comments)commenttext=1 Comment;if(commenttext==0 Comments)commenttext=No Comments;commenttext=<a href="+commenturl+" target ="_top">+commenttext+</a>;towrite=towrite+commenttext;flag=1;;}
if(displaymore==true)
{if(flag==1)towrite=towrite+ | ;towrite=towrite+<a href="+posturl+" class="url" target ="_top">More »</a>;flag=1;;}
document.write(towrite);document.write(</li>);if(displayseparator==true)
if(i!=(numposts-1))
document.write();}document.write(</ul>);}
//]]>
</script>

Note: to add your own pic for the posts with no thumbnail, replace the image url in blue with your own

So we have added the Css to style the widget and the script to make it work. Now all we have to do is to add the widgets code to the blog sidebar in a Html/Javascript gadget:

Step 4. Go to Layout - click on Add a Gadget


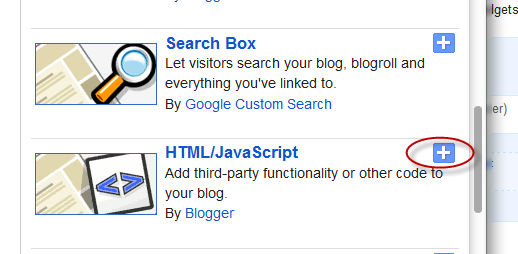
Step 5. Choose the HTML/Javascript widget and paste this code inside the empty box:

<script type=text/javascript>var numposts = 3;var showpostthumbnails = true;var displaymore = false;var displayseparator = true;var showcommentnum = false;var showpostdate = false;var showpostsummary = true;var numchars = 100;</script>
<script type="text/javascript" src="/feeds/posts/default/-/Name-of-the-label?published&alt=json-in-script&callback=labelthumbs"></script>

Note: Where it says Name-of-the-label is the name of the label you want to display, and if your label is case sensitive, like in my example, then you should type it that way.

Also within the last code, there are parts that we can customize, just change true with false or vice versa:

var numposts ← Number of posts to display
var showpostthumbnails ← Show/hide thumbnails
var displaymore ← Show or hide the read more link
var displayseparator ← Show/hide separator
var showcommentnum ← Show/hide the number of comments
var showpostdate ← Show/hide the posts dates
var showpostsummary ← Show or not the posts summaries
var numchars ← Number of posts characters (here you have to change the 100 value)

Remember that the gadget displays the latest posts from a particular label, therefore, if you want to display the latest posts from other labels then just repeat step 5 for each additional category you want to add.

Thats it :) Enjoy!
Read More..

Rabu, 25 September 2013

Recent Comments Widget For Blogger


The Recent Comments Widget for Blogger displays the recent blog comments on your blogs sidebar, showing a snippet of the last comments along with the title of the post to which the comment was made. If you want to encourage your readers in leaving comments on your blog, this is a widget I would recommend.

How To Install The Recent Comments Widget For Blogger

Step 1. Go to your Blogger Dashboard >> Layout >> Add a Gadget


Step 2. From the pop-up window, scroll down and choose the HTML/JavaScript option:


Step 3. Now copy and paste the below code in the HTML/JavaScript box:

<script style=text/javascript src="http://helplogger.googlecode.com/svn/trunk/recent comments widget.js"></script><script style=text/javascript >var a_rc=5;var m_rc=false;var n_rc=true;var o_rc=100;</script><script src=http://your-blog-name.blogspot.com/feeds/comments/default?alt=json-in-script&callback=showrecentcomments ></script><span id=rcw-cr><a href=http://helplogger.blogspot.com/2012/03/recent-comments-widget-for-blogger.html>Recent Comments Widget</a></span><style type=text/css> .rcw-comments a {text-transform: capitalize;} .rcw-comments {border-bottom: 1px dotted; padding-top: 7px!important; padding-bottom: 7px!important;} #rcw-cr {font-family: Arial,Tahoma;font-size:9px;padding-top:7px;display:block;} </style>

Step 4. Replace your-blog-name with your blog url.

Step 5. Click Save and youre done.

Hope youll enjoy it!
Read More..

Selasa, 24 September 2013

Simple Recent Posts Widget for Blogger Blogspot

The main advantage on this Recent Posts widget is that it will show not only post titles but also post excerpts or snippets and its easy to customize/ apply different style on it. To style it into your own design, you just have to modify the CSS style - you can change the link or background color, the size and color of text/links.

What you can do with this widget:
  • display post titles only
  • change the number of posts
  • change the number of characters of the post snippet/excerpt
  • show the post dates

See the screenshot below:

How to add Recent Posts Widget to Blogger

Step 1. Log in to your Blogger Dashboard, then go to Layout and click on Add a Gadget link


Step 2. From the pop-up window, scroll down and choose HTML/JavaScript


Step 3. Select & Copy the code from one of the options below and paste it into the new HTML/JavaScript:

Option 1: Recent posts widget with snippets

<div id="hlrpsa">
<script src="http://helplogger.googlecode.com/svn/trunk/recent-posts-with-snippets.js">
</script>
<script>
var numposts = 5;var showpostdate = false;var showpostsummary = true;var numchars = 100;var standardstyling = true;
</script>
<script src="http://your-blog.blogspot.com/feeds/posts/default?orderby=published&amp;alt=json-in-script&amp;callback=showrecentposts">
</script></div>
<div id="rpdr" style="font-family: arial, sans-serif; font-size: 9px;">
<a href="http://helplogger.blogspot.com/2012/04/recent-posts-widget-for-bloggerblogspot.html" target="_blank" title="Grab this Recent Posts Widget">Recent Posts Widget</a> by <a href="http://helplogger.blogspot.com" title="Recent Posts Widget">Helplogger</a></div>
<noscript>Your browser does not support JavaScript!</noscript>
<style type="text/css">
#hlrpsa a {color: #0B3861; font-size: 13px;} #rpdr {background: url(https://blogger.googleusercontent.com/img/b/R29vZ2xl/AVvXsEjckPo4VGPg5ZPkuQZ-wDDei1-XInSfB6f92c2UkP9xtDT1BqLmOILDjlotR3zBg0doc6qK6hC2gTOWBCzDLXC8HkmJtcR0vmMxBpZhJiOPqHc_ZwzBG1SZ-V61et-gy46OHNSRLsOi_1pT/s1600/blogger.png) 0px 0px no-repeat; padding: 1px 0px 0px 19px; height:14px; margin: 5px 0px 0px 0px;line-height:14px;}
#rpdr, #rpdr a {color:#808080;}
#hlrpsa { color: #999999; font-size: 11px; border-bottom:1px #cccccc dotted; margin-top:-10px; padding-bottom:10px;}
.hlrps a {font-weight:bold; }
.hlrpssumm {}
</style>

Option 2: Recent Posts Widget Showing Post Titles Only

<div id="hlrpsb">
<script style="text/javascript" src="http://helplogger.googlecode.com/svn/trunk/recent-posts-with-titles-only.js"></script>
<script style="text/javascript">var numposts = 10;var showpostdate = false;var showpostsummary = false;var numchars = 100;var standardstyling = true;</script>
<script src="http://your-blog.blogspot.com/feeds/posts/default?orderby=published&alt=json-in-script&callback=showrecentposts"></script></div>
<div style="font-family: arial, sans-serif; font-size: 9px;" id="rpdr"><a href="http://helplogger.blogspot.com/2012/04/recent-posts-widget-for-bloggerblogspot.html" title="Grab this Recent Posts Widget" target="_blank">Recent Posts Widget</a> by <a href="http://helplogger.blogspot.com" title="Recent Posts Widget">Helplogger</a></div><noscript>Oops! Make sure JavaScript is enabled in your browser.</noscript>
<style type=text/css>
#hlrpsb a {color: #0B3861; font-size: 13px;} #rpdr {background: url( https://blogger.googleusercontent.com/img/b/R29vZ2xl/AVvXsEjckPo4VGPg5ZPkuQZ-wDDei1-XInSfB6f92c2UkP9xtDT1BqLmOILDjlotR3zBg0doc6qK6hC2gTOWBCzDLXC8HkmJtcR0vmMxBpZhJiOPqHc_ZwzBG1SZ-V61et-gy46OHNSRLsOi_1pT/s1600/blogger.png ) 0px 0px no-repeat; padding: 1px 0px 0px 19px; height:14px; margin: 5px 0px 0px 0px;line-height:14px;}
#rpdr, #rpdr a {color:#808080;}
.bbrecpost2 {
padding-top:6px;
padding-bottom:6px;
border-bottom: 1px #cccccc dotted; }
</style>

Step 4.
  • Change 5 (option 1) and 10 (option 2) with the number of posts you want to display. 
  • Change false to true if you want the posts dates to appear 
  • Change 100 (option 1) if you want more characters to be displayed.
  • To change the color and font size of the links, modify the values in blue (links) and violet (font-size)
  • To change the style of posts summary, modify the values in green (color) and orange (font size)
  • Replace the your-blog text with the name of your blog or if you have a custom domain change all the bolded line with your address like in this example:
http://www.your-site.com/feeds/posts/default....

Step 5. Save your widget. And thats it! Enjoy!

If you need any help, leave a comment below.
And if you liked this post, please consider sharing it. Thanks.

Read More..

Kamis, 19 September 2013

Add Recent Comments Widget with Avatars To Blogger

In the past tutorial, Ive shared a simple Recent Comments widget, now you have the option to add a stylish Recent comments widget with round avatars, which comes along with comment excerpts. You also have the option to change default Anonymous Avatar Image.


How to add recent comments widget with avatars

Step 1. Go to Blogger Dashboard, then go to Layout and click on Add a Gadget link.

avatars, recent comments blogger, blogger widgets

Step 2. In the popup window scroll down + choose HTML/Javascript


Step 3. Paste in the following code in the empty box:

<style type="text/css">
ul.w2b_recent_comments {
    list-style: none;
    margin: 0;
    padding: 0;
}

.w2b_recent_comments li {
    background: none !important;
    margin: 0 0 6px !important;
    padding: 0 0 6px 0 !important;
    display: block;
    clear: both;
    overflow: hidden;
    list-style: none;
}

.w2b_recent_comments li .avatarImage {
    padding: 3px;
    background: #fefefe;
    -webkit-box-shadow: 0 1px 1px #ccc;
    -moz-box-shadow: 0 1px 1px #ccc;
    box-shadow: 0 1px 1px #ccc;
    float: left;
    margin: 0 6px 0 0;
    position: relative;
    overflow: hidden;
}

.avatarRound {
    -webkit-border-radius: 100px;
    -moz-border-radius: 100px;
    border-radius: 100px;
}

.w2b_recent_comments li img {
    padding: 0px;
    position: relative;
    overflow: hidden;
    display: block;
}

.w2b_recent_comments li span {
    margin-top: 4px;
    color: #666;
    display: block;
    font-size: 12px;
    font-style: italic;
    line-height: 1.4;
}
</style>
<script type="text/javascript">
//<![CDATA[
    // Recent Comments Settings
    var
 numComments  = 5,
 showAvatar  = true,
 avatarSize  = 60,
 roundAvatar = true,
 characters  = 40,
 showMorelink = false,
 moreLinktext = "More »",
 defaultAvatar  = "http://www.gravatar.com/avatar/?d=mm",
 hideCredits = true;
//]]>
</script>
<script type="text/javascript" src="http://helplogger.googlecode.com/svn/trunk/w2b recent comments with avatars.js"></script>
<script type="text/javascript" src="http://your-blog.blogspot.com/feeds/comments/default?alt=json&callback=w2b_recent_comments&max-results=5"></script>

Note
Replace your-blog with the name of your blog.
Replace the "5" values in red, with the number of comments you want to appear... from:

  • numComments  = 

and

  • &max-results=5 

To change the anonymous avatar, replace the following address with your own:
  • http://www.gravatar.com/avatar/?d=mm 

To change the size of the avatar, replace 60 value in green with your own

Step 4. After youve made the changes, click Save... and youre done!

The credit goes to Hrish @ way2blogging.org
Read More..

Rabu, 11 September 2013

Expandable Recent Comments Widget for Blogger Blogspot

This Expandable Recent Comments is a very accessible widget that can be collapsed or expanded through user interaction, so that now, we dont have to click on the commenter or post title link in order to see the content of a comment.
recent comments widget, blogger gadgets, blogspot tricks

The expanding content can be shown or hidden by clicking on the plus/minus icon or by pressing the "Show all" or "Hide all" button at run time.

How To Add The Expandable Recent Comments Widget to Blogger

Step 1. Log in to your Blogger dashboard and go to Layout > Click on "Add a Gadget" link


Step 2. From the pop-up window, scroll down and click on the HTML/JavaScript widget


Step 3. Copy and paste this code inside the empty box:
<style type="text/css" media="screen">
.row-aa {        background: #f2f2f3; }
.row-bb {        background: #F8F5F1; }
.row-div { 
  margin:0px;
  padding:5px;
}
.comment-header {
  font-size:0.9em;
//  border:1px solid #E0E0E0;
//  background-color:#F3F3F3;
  padding:4px;
  margin-top:10px;
  margin-bottom:5px;
}
.comment-box {
  margin:0px;
  padding:0px;
  font-size:0.9em;
  height:500px;
  overflow:auto;
}
.comments1  { 
//  background: #F3F3F3;
  padding:3px;
  border-left:1px dashed #A6A6A6;
  color: #888888;
  font-style: italic;
  padding-top:4px;
  margin-bottom:5px;
}
.comment-footer {
  text-align:center;
  font-size:0.9em;
  padding:4px;
  margin-top:5px; 
}
</style>

<div style="text-align: center" class="comment-header"><input class="comment-button" id="commshowall" type="button" onclick="if (this.value == &#39;Show all&#39;) { unfold_all(this); this.value=&#39;Hide all&#39;; } else { fold_all(this); this.value=&#39;Show all&#39;; }" style="width:8em;font-size:1em;font-family:Verdana,sans" value="Show all" /></div>

<div class="comment-box">
<script type="text/javascript" src="http://helplogger.googlecode.com/svn/trunk/expandable-recent-comments.js"></script>
<script type="text/javascript"  src="http://helplogger.blogspot.com/feeds/posts/default?start-index=1&max-results=999999&alt=json-in-script&callback=showrecentposts">
</script>
<script type="text/javascript"  src="http://helplogger.blogspot.com/feeds/comments/default?start-index=1&max-results=999999&alt=json-in-script&callback=showrecentcomments">
</script>

</div>

Note: Replace http://helplogger.blogspot.com with your blog/site address.

Step 4. Save your widget and youre done!

Enjoy :)
Read More..