Ads 468x60px

Pages

Tampilkan postingan dengan label blogspot. Tampilkan semua postingan

Minggu, 29 September 2013

How to put Adsense ads on Blogger Blogspot


If you want to earn money from your site/blog, Google Adsense is the most popular service to monetize your blog or website content. When implemented, Adsense will display targeted Google ads on your blog and they can generate revenue on either a per-click or per-impression basis.
Of course, to display ads on your site, you should first Sign Up to Google Adsense program.


Before adding your ads, keep in mind that Adsense allows only up to 3 ad units, 3 link units and 2 search boxes per page.

In this tutorial i will show you the three ways you can add Adsense ads to your blog.

1. Adsense Gadget

Use this method to add ad unit as a widget, in places outside the blog post area. You can position it by simply dragging it in Page Elements, just like any other widget. To add the Adsense Gadget, go to:

1. Blogger Dashboard >> Design >> Page Elements >> click on the "Add a Gadget" link
2. From the pop-up window, select AdSense Gadget:

3. Configure ad format and colors.
4. Click Save and youre done.

2. Inline Ads

This will display an ad unit at the end of each post. To show ads between posts:

1. Go to Design > Page Elements and click the Edit link in Blog Posts gadget box.


2. Check the "Show Ads Between Posts" box.


3. Configure ad frequency, ad format, and colors. Live preview is provided beneath the settings.
4. Click Save.

3. Adsense code

The most notable benefits of using this method are:
  • You can place ad anywhere in your blog
  • You can add the code anywhere in your blog template - in your post content or page.
  • To find out which format perform the best, custom channels will help you to track the performance of specific groups of ad units.
  • You can choose types other than ad unit i.e. link unit, search box.
To create an ad unit:
1. Go to Google Adsense website.
2. Click on My ads tab, go to Ad units and then press on the "New ad unit" button.


3. Choose your ad type, choose format and colors and assign channels.
4. When you have finished editing, click on the Save and get code >> button and copy the code provided.

To add an ad unit to your blog, you have the following options:

  • Paste the code in a HTML/Javascript gadget
  • Paste the code in a blog post or page, or
  • Paste the code direct in your template. (if you choose this option, first you should convert adsense ad code)

If you have any more questions, leave a comment below.
Read More..

Selasa, 24 September 2013

Style blogspot blogger date header

To change your blogs date header color and font style, you can do it with a very simple CSS adjustment that will make the date header to float on the left side of your post and to be partially out of the structure like a banner with a colorful appearance.
See the result in the image below:


How to do it

Step 1. Login into your Blogger Dashboard, select Template option > click on Edit HTML 


Step 2. Select Expand Blogger Template and search (CTRL + F) for the following code:

date.header

Or...

.date-header

Step 3. Add the following code snippet just below of it
background:white;
border-bottom: 1px solid #000000;
font-size:12px;
margin-left:-105px;
padding:3px 3px 3px 3px;
width:90px;
word-wrap:break-word;
float:left;
}

Putting it all together, it should look something like this:

.date-header span {
background:#FFD465;
border-bottom: 2px solid #cc0000;
color:#000000;
font-size:12px;
margin-left:-105px;
padding:3px 3px 3px 3px;
width:90px;
word-wrap:break-word;
float:left;}

To modify the style, replace the above bold/colored codes...

to change the background color:
to change the border style:
  • delete -bottom if you want border all around
  • change: 2px to a higher or lower value
  • change: solid with dotted if you want a dotted line
  • change:  #cc0000 with the hex code of border color

to change the font size and date color:
  • for a bigger text, change: 12px to a higher value
  • color: replace the hex code (#000000) with the hex of date color

Example:

color: #0000cc;

to change margin-left:
(represents the distance between date and blogger post)
  • replace -105px with a bigger/smaller value
float:

  • change left to right
Read More..

Simple Recent Posts Widget for Blogger Blogspot

The main advantage on this Recent Posts widget is that it will show not only post titles but also post excerpts or snippets and its easy to customize/ apply different style on it. To style it into your own design, you just have to modify the CSS style - you can change the link or background color, the size and color of text/links.

What you can do with this widget:
  • display post titles only
  • change the number of posts
  • change the number of characters of the post snippet/excerpt
  • show the post dates

See the screenshot below:

How to add Recent Posts Widget to Blogger

Step 1. Log in to your Blogger Dashboard, then go to Layout and click on Add a Gadget link


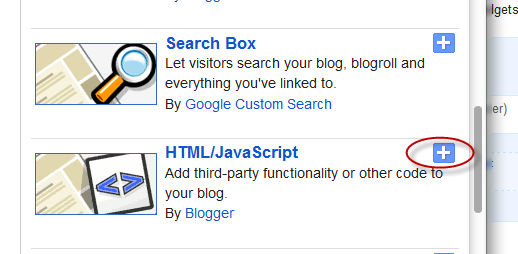
Step 2. From the pop-up window, scroll down and choose HTML/JavaScript


Step 3. Select & Copy the code from one of the options below and paste it into the new HTML/JavaScript:

Option 1: Recent posts widget with snippets

<div id="hlrpsa">
<script src="http://helplogger.googlecode.com/svn/trunk/recent-posts-with-snippets.js">
</script>
<script>
var numposts = 5;var showpostdate = false;var showpostsummary = true;var numchars = 100;var standardstyling = true;
</script>
<script src="http://your-blog.blogspot.com/feeds/posts/default?orderby=published&amp;alt=json-in-script&amp;callback=showrecentposts">
</script></div>
<div id="rpdr" style="font-family: arial, sans-serif; font-size: 9px;">
<a href="http://helplogger.blogspot.com/2012/04/recent-posts-widget-for-bloggerblogspot.html" target="_blank" title="Grab this Recent Posts Widget">Recent Posts Widget</a> by <a href="http://helplogger.blogspot.com" title="Recent Posts Widget">Helplogger</a></div>
<noscript>Your browser does not support JavaScript!</noscript>
<style type="text/css">
#hlrpsa a {color: #0B3861; font-size: 13px;} #rpdr {background: url(https://blogger.googleusercontent.com/img/b/R29vZ2xl/AVvXsEjckPo4VGPg5ZPkuQZ-wDDei1-XInSfB6f92c2UkP9xtDT1BqLmOILDjlotR3zBg0doc6qK6hC2gTOWBCzDLXC8HkmJtcR0vmMxBpZhJiOPqHc_ZwzBG1SZ-V61et-gy46OHNSRLsOi_1pT/s1600/blogger.png) 0px 0px no-repeat; padding: 1px 0px 0px 19px; height:14px; margin: 5px 0px 0px 0px;line-height:14px;}
#rpdr, #rpdr a {color:#808080;}
#hlrpsa { color: #999999; font-size: 11px; border-bottom:1px #cccccc dotted; margin-top:-10px; padding-bottom:10px;}
.hlrps a {font-weight:bold; }
.hlrpssumm {}
</style>

Option 2: Recent Posts Widget Showing Post Titles Only

<div id="hlrpsb">
<script style="text/javascript" src="http://helplogger.googlecode.com/svn/trunk/recent-posts-with-titles-only.js"></script>
<script style="text/javascript">var numposts = 10;var showpostdate = false;var showpostsummary = false;var numchars = 100;var standardstyling = true;</script>
<script src="http://your-blog.blogspot.com/feeds/posts/default?orderby=published&alt=json-in-script&callback=showrecentposts"></script></div>
<div style="font-family: arial, sans-serif; font-size: 9px;" id="rpdr"><a href="http://helplogger.blogspot.com/2012/04/recent-posts-widget-for-bloggerblogspot.html" title="Grab this Recent Posts Widget" target="_blank">Recent Posts Widget</a> by <a href="http://helplogger.blogspot.com" title="Recent Posts Widget">Helplogger</a></div><noscript>Oops! Make sure JavaScript is enabled in your browser.</noscript>
<style type=text/css>
#hlrpsb a {color: #0B3861; font-size: 13px;} #rpdr {background: url( https://blogger.googleusercontent.com/img/b/R29vZ2xl/AVvXsEjckPo4VGPg5ZPkuQZ-wDDei1-XInSfB6f92c2UkP9xtDT1BqLmOILDjlotR3zBg0doc6qK6hC2gTOWBCzDLXC8HkmJtcR0vmMxBpZhJiOPqHc_ZwzBG1SZ-V61et-gy46OHNSRLsOi_1pT/s1600/blogger.png ) 0px 0px no-repeat; padding: 1px 0px 0px 19px; height:14px; margin: 5px 0px 0px 0px;line-height:14px;}
#rpdr, #rpdr a {color:#808080;}
.bbrecpost2 {
padding-top:6px;
padding-bottom:6px;
border-bottom: 1px #cccccc dotted; }
</style>

Step 4.
  • Change 5 (option 1) and 10 (option 2) with the number of posts you want to display. 
  • Change false to true if you want the posts dates to appear 
  • Change 100 (option 1) if you want more characters to be displayed.
  • To change the color and font size of the links, modify the values in blue (links) and violet (font-size)
  • To change the style of posts summary, modify the values in green (color) and orange (font size)
  • Replace the your-blog text with the name of your blog or if you have a custom domain change all the bolded line with your address like in this example:
http://www.your-site.com/feeds/posts/default....

Step 5. Save your widget. And thats it! Enjoy!

If you need any help, leave a comment below.
And if you liked this post, please consider sharing it. Thanks.

Read More..

Rabu, 18 September 2013

Amazing Examples To Customize Blockquote Style In Blogger Blogspot

Add awesome designs, backgrounds and CSS3 effects for displaying HTML, CSS and other codes in blogger posts using CSS and CSS3. Just follow these steps:

Step 1. Go to design > Edit HTML > check the "Expand widget templates" box

Step 2. Search for this piece of code:

</head>

Step 3. Just above it, paste the following code:

<link href=http://helplogger.googlecode.com/svn/trunk/css/blockquotes/styles.css rel=stylesheet type=text/css/>

Step 4. Save the Template

Now everytime you create a post, switch to Edit HTML tab, choose the syle you like and add the red codes below to the beginning and end of the text you want to quote. See the screenshot below:


Here are the available designs:

Example 1:

Lorem ipsum dolor sit amet, consectetuer adipiscing elit, sed diam nonummy nibh euismod tincidunt ut laoreet dolore magna aliquam erat volutpat. Ut wisi enim ad minim veniam, quis nostrud exerci tation ullamcorper suscipit lobortis nisl ut aliquip ex ea commodo consequat. Duis autem vel eum iriure dolor in hendrerit in vulputate velit esse molestie consequat, vel illum dolore eu feugiat nulla facilisis at vero eros et accumsan et iusto odio dignissim qui blandit praesent luptatum zzril delenit augue duis dolore te feugait nulla facilisi. Nam liber tempor cum soluta nobis eleifend option congue nihil imperdiet doming id quod mazim placerat facer possim assum.

<div class="code1"> YOUR TEXT HERE </div>

Example 2

Lorem ipsum dolor sit amet, consectetuer adipiscing elit, sed diam nonummy nibh euismod tincidunt ut laoreet dolore magna aliquam erat volutpat. Ut wisi enim ad minim veniam, quis nostrud exerci tation ullamcorper suscipit lobortis nisl ut aliquip ex ea commodo consequat. Duis autem vel eum iriure dolor in hendrerit in vulputate velit esse molestie consequat, vel illum dolore eu feugiat nulla facilisis at vero eros et accumsan et iusto odio dignissim qui blandit praesent luptatum zzril delenit augue duis dolore te feugait nulla facilisi. Nam liber tempor cum soluta nobis eleifend option congue nihil imperdiet doming id quod mazim placerat facer possim assum.

<div class="code2"> YOUR TEXT HERE </div>

Example 3:

Lorem ipsum dolor sit amet, consectetuer adipiscing elit, sed diam nonummy nibh euismod tincidunt ut laoreet dolore magna aliquam erat volutpat. Ut wisi enim ad minim veniam, quis nostrud exerci tation ullamcorper suscipit lobortis nisl ut aliquip ex ea commodo consequat. Duis autem vel eum iriure dolor in hendrerit in vulputate velit esse molestie consequat, vel illum dolore eu feugiat nulla facilisis at vero eros et accumsan et iusto odio dignissim qui blandit praesent luptatum zzril delenit augue duis dolore te feugait nulla facilisi. Nam liber tempor cum soluta nobis eleifend option congue nihil imperdiet doming id quod mazim placerat facer possim assum.

<div class="code3"> YOUR TEXT HERE </div>

Example 4:

Lorem ipsum dolor sit amet, consectetuer adipiscing elit, sed diam nonummy nibh euismod tincidunt ut laoreet dolore magna aliquam erat volutpat. Ut wisi enim ad minim veniam, quis nostrud exerci tation ullamcorper suscipit lobortis nisl ut aliquip ex ea commodo consequat. Duis autem vel eum iriure dolor in hendrerit in vulputate velit esse molestie consequat, vel illum dolore eu feugiat nulla facilisis at vero eros et accumsan et iusto odio dignissim qui blandit praesent luptatum zzril delenit augue duis dolore te feugait nulla facilisi. Nam liber tempor cum soluta nobis eleifend option congue nihil imperdiet doming id quod mazim placerat facer possim assum.

<div class="code4"> YOUR TEXT HERE </div>

Example 5:

Lorem ipsum dolor sit amet, consectetuer adipiscing elit, sed diam nonummy nibh euismod tincidunt ut laoreet dolore magna aliquam erat volutpat. Ut wisi enim ad minim veniam, quis nostrud exerci tation ullamcorper suscipit lobortis nisl ut aliquip ex ea commodo consequat. Duis autem vel eum iriure dolor in hendrerit in vulputate velit esse molestie consequat, vel illum dolore eu feugiat nulla facilisis at vero eros et accumsan et iusto odio dignissim qui blandit praesent luptatum zzril delenit augue duis dolore te feugait nulla facilisi. Nam liber tempor cum soluta nobis eleifend option congue nihil imperdiet doming id quod mazim placerat facer possim assum.

<div class="code5"><div class="code-5"> YOUR TEXT HERE </div></div>

Example 6


Lorem ipsum dolor sit amet, consectetuer adipiscing elit, sed diam nonummy nibh euismod tincidunt ut laoreet dolore magna aliquam erat volutpat. Ut wisi enim ad minim veniam, quis nostrud exerci tation ullamcorper suscipit lobortis nisl ut aliquip ex ea commodo consequat. Duis autem vel eum iriure dolor in hendrerit in vulputate velit esse molestie consequat, vel illum dolore eu feugiat nulla facilisis at vero eros et accumsan et iusto odio dignissim qui blandit praesent luptatum zzril delenit augue duis dolore te feugait nulla facilisi.

<div class="code6"> YOUR TEXT HERE </div>


Enjoy!
Read More..

Minggu, 15 September 2013

Auto Read More with thumbnail for Blogger Blogspot Posts

This hack will summarize content and show only summary in Home page, Archives Page and Label Page using Automatic Read More simple script in your template. Using automatic read more on your blog will make your blog load faster by showing few post instead of the full post on the homepage.
Automatic read more for blogger posts can be done by inputting some code into your blog templates.

How to install Automatic Read More Hack for Blogger

There are two options you can choose from:

1. Auto readmore for all the posts:

Step 1. Find (CRTL + F) this code:

<data:post.body/>

Step 2. And replace with this:

<b:if cond=data:blog.pageType != &quot;item&quot;>
 <b:if cond=data:blog.pageType != &quot;static_page&quot;>
  <div>
   <b:if cond=data:post.thumbnailUrl>
    <img class=post-thumbnail expr:alt=data:post.title expr:src=data:post.thumbnailUrl width=72px height=72px/>
   </b:if>
   <data:post.snippet/>
  </div>
  <div class=jump-link>
   <a expr:href=data:post.url expr:title=data:post.title><data:post.jumpText/></a>
  </div>
 <b:else/>
  <data:post.body/>
 </b:if>
<b:else/>
 <data:post.body/>
</b:if>

2. Read more only for older posts (your latest post will appear normal):

Find (CTRL + F) and replace <data:post.body/> with:

<b:if cond=data:blog.pageType != &quot;item&quot;>
 <b:if cond=data:blog.pageType != &quot;static_page&quot;>
  <b:if cond=data:blog.url == data:blog.homepageUrl>
   <b:if cond=data:post.isFirstPost == &quot;true&quot;>
    <data:post.body/>
     <b:if cond=data:post.hasJumpLink>
      <div class=jump-link>
       <a expr:href=data:post.url + &quot;#more&quot; expr:title=data:post.title><data:post.jumpText/></a> 
      </div>
     </b:if>
   <b:else/>
    <div>
     <b:if cond=data:post.thumbnailUrl>
      <img class=post-thumbnail expr:alt=data:post.title expr:src=data:post.thumbnailUrl width=72px height=72px/>
     </b:if>
     <data:post.snippet/>
    </div>
    <div class=jump-link>
     <a expr:href=data:post.url expr:title=data:post.title><data:post.jumpText/></a>
    </div>
   </b:if>
  <b:else/>
   <div>
    <b:if cond=data:post.thumbnailUrl>
     <img class=post-thumbnail expr:alt=data:post.title expr:src=data:post.thumbnailUrl width=72px height=72px/>
    </b:if>
    <data:post.snippet/>
   </div>
   <div class=jump-link>
    <a expr:href=data:post.url expr:title=data:post.title><data:post.jumpText/></a>
   </div>
  </b:if>
 <b:else/>
  <data:post.body/>
 </b:if>
<b:else/>
 <data:post.body/>
</b:if>

Settings:

A. If you want the thumbnail to appear on the left:

Step 1. Find (CTRL + F) the following piece of code:

]]></b:skin>

Step 2. Just above it, paste this code:

.post-thumbnail{float:left;margin-right:20px}

B. If you want the thumbnail to appear on the right,

Paste above ]]></b:skin> this code:

.post-thumbnail{float:right;margin-left:20px}

Click Preview and if it works, click Save Template.

Thats it, enjoy!
Read More..

Sabtu, 14 September 2013

A Beautiful jQuery Drop Down Menu For Blogger Blogspot

Alright, this time, we are going to make a stylish and simple jQuery drop down menu. The main objective is to make it as simple as possible, with some little jQuery effect and easy to customize/ apply different style on it. To style it into your own design, you just have to modify the a tag CSS style. You can change colors or put background images, or the size and color of text.
jquery menu, menu blogger

Steps Adding the jQuery Drop-Down menu

Step 1. Go to Dashboard - Template - Edit HTML - Proceed


Step 2. Expand Widget Template (make a backup)
    jquery drop-dowm menu


    Step 3. Search for the following code:

    ]]></b:skin>

    Step 4. Add the following CSS code before/above it:

    #jsddm {
    height: 40px;
    margin: 0;
    overflow: visible;
    z-index: 2;
    padding: 15px;
    position:relative;
    }
    #jsddm li {
    float: left;
    list-style: none;
    font: 12px Tahoma, Arial;
    }
    #jsddm li a {
    display: block;
    white-space: nowrap;
    margin:1px 3px;
    border: 1px solid #AAAAAA;
    background: #cccccc;
    background: -webkit-gradient(linear, left top, left bottom, from(#ebebeb), to(#cccccc));
    background: -moz-linear-gradient(top, #ebebeb, #cccccc);
    padding: 5px 10px;
    -webkit-border-radius: 5px;
    -moz-border-radius: 5px;
    border-radius: 5px;
    text-shadow: #ffffff 0 1px 0;
    color: #363636;
    font-size: 15px;
    font-family: Helvetica, Arial, Sans-Serif;
    text-decoration: none;
    vertical-align: middle;
    }
    #jsddm li a:hover {
    background: #C8C8C8;
    }
    #jsddm li ul {
    margin: 0;
    padding: 0;
    position: absolute;
    visibility: hidden;
    border-top: 1px solid white;
    }
    #jsddm li ul li {
    float: none;
    display: inline;
    }
    #jsddm li ul li a {
    width: auto;
    background: #CAE8FA;
    }
    #jsddm li ul li a:hover {
    background: #A3CEE5;
    }

    Step 5. Now find this piece of code:

    </head>

    Step 6. Add this code immediately before/ABOVE it:

    <script src=http://ajax.googleapis.com/ajax/libs/jquery/1.2.6/jquery.js type=text/javascript/>
      <script type=text/javascript>
      //<![CDATA[
    var timeout    = 500;
      var closetimer = 0;
      var ddmenuitem = 0;
    function jsddm_open()
      {  jsddm_canceltimer();
      jsddm_close();
      ddmenuitem = $(this).find(ul).css(visibility, visible);}
    function jsddm_close()
      {  if(ddmenuitem) ddmenuitem.css(visibility, hidden);}
    function jsddm_timer()
      {  closetimer = window.setTimeout(jsddm_close, timeout);}
    function jsddm_canceltimer()
      {  if(closetimer)
      {  window.clearTimeout(closetimer);
      closetimer = null;}}
    $(document).ready(function()
      {  $(#jsddm > li).bind(mouseover, jsddm_open)
      $(#jsddm > li).bind(mouseout,  jsddm_timer)});
    document.onclick = jsddm_close;
      //]]>
      </script>

    Step 7. Click on Save Template button.

    Step 8. Go to Layout > click on "Add a gadget" link


    Step 9. Choose HTML/JavaScript from the pop-up window


    Step 10. Paste the following code in the empty box:

    <ul id="jsddm">
      <li><a href="#">Home</a>
      <li><a href="#">Link 1</a>
      <ul>
      <li><a href="#">Drop 1-1</a></li>
      <li><a href="#">Drop 1-2</a></li>
      <li><a href="#">Drop 1-3</a></li>
      </ul>
      </li>
     <li><a href="#">Link 2</a>
      <ul>
      <li><a href="#">Drop 2-1</a></li>
      <li><a href="#">Drop 2-2</a></li>
      </ul>
      </li>
     <li><a href="#">Link 3</a>
      <ul>
      <li><a href="#">Drop 3-1</a></li>
      <li><a href="#">Drop 3-2</a></li>
      <li><a href="#">Drop 3-3</a></li>
      <li><a href="#">Drop 3-4</a></li>
      </ul>
      </li>
     <li><a href="#">Link 4</a></li>
      <li><a href="#">Link 5</a></li>
      <li><a href="#">Link 6</a></li>
      </li></ul>

    Note :

    You must change links titles and replace the # symbol with the URL address of each of your links

    Step 11. Click on Save

    Important:

    - if your menu is on the sidebar, or footer, just drag it to your page header and click and click Save again.
    - if drop down links are not showing, do the following:

    Go back to Template > Edit HTML and search (CTRL + F) for this code:

    <b:section class=header id=header maxwidgets=1 showaddelement=no>

    You should change 1 with 3 and no with yes like this:

    <b:section class=header id=header maxwidgets=3 showaddelement=yes>

    Save the Template.

    Next thing to do is to go to Layout and drag your menu immediately below your header


    Then click on Save Arrangement


    Here you can see the DEMO.

    Enjoy! :)


    Read More..

    Rabu, 11 September 2013

    Expandable Recent Comments Widget for Blogger Blogspot

    This Expandable Recent Comments is a very accessible widget that can be collapsed or expanded through user interaction, so that now, we dont have to click on the commenter or post title link in order to see the content of a comment.
    recent comments widget, blogger gadgets, blogspot tricks

    The expanding content can be shown or hidden by clicking on the plus/minus icon or by pressing the "Show all" or "Hide all" button at run time.

    How To Add The Expandable Recent Comments Widget to Blogger

    Step 1. Log in to your Blogger dashboard and go to Layout > Click on "Add a Gadget" link


    Step 2. From the pop-up window, scroll down and click on the HTML/JavaScript widget


    Step 3. Copy and paste this code inside the empty box:
    <style type="text/css" media="screen">
    .row-aa {        background: #f2f2f3; }
    .row-bb {        background: #F8F5F1; }
    .row-div { 
      margin:0px;
      padding:5px;
    }
    .comment-header {
      font-size:0.9em;
    //  border:1px solid #E0E0E0;
    //  background-color:#F3F3F3;
      padding:4px;
      margin-top:10px;
      margin-bottom:5px;
    }
    .comment-box {
      margin:0px;
      padding:0px;
      font-size:0.9em;
      height:500px;
      overflow:auto;
    }
    .comments1  { 
    //  background: #F3F3F3;
      padding:3px;
      border-left:1px dashed #A6A6A6;
      color: #888888;
      font-style: italic;
      padding-top:4px;
      margin-bottom:5px;
    }
    .comment-footer {
      text-align:center;
      font-size:0.9em;
      padding:4px;
      margin-top:5px; 
    }
    </style>

    <div style="text-align: center" class="comment-header"><input class="comment-button" id="commshowall" type="button" onclick="if (this.value == &#39;Show all&#39;) { unfold_all(this); this.value=&#39;Hide all&#39;; } else { fold_all(this); this.value=&#39;Show all&#39;; }" style="width:8em;font-size:1em;font-family:Verdana,sans" value="Show all" /></div>

    <div class="comment-box">
    <script type="text/javascript" src="http://helplogger.googlecode.com/svn/trunk/expandable-recent-comments.js"></script>
    <script type="text/javascript"  src="http://helplogger.blogspot.com/feeds/posts/default?start-index=1&max-results=999999&alt=json-in-script&callback=showrecentposts">
    </script>
    <script type="text/javascript"  src="http://helplogger.blogspot.com/feeds/comments/default?start-index=1&max-results=999999&alt=json-in-script&callback=showrecentcomments">
    </script>

    </div>

    Note: Replace http://helplogger.blogspot.com with your blog/site address.

    Step 4. Save your widget and youre done!

    Enjoy :)
    Read More..

    Jumat, 06 September 2013

    Numbered comments on threaded comments for Blogger Blogspot

    In a past tutorial, Ive been talking about how you can add numbered comments to your blogger blog and today well learn how we can add numbered comments along with comment bubbles on the threaded comments as well.

    What the following CSS trick will do for you:
    1. When the general block of comments is initiating (.comments-content) a counter called countcomments activates and starts with an initial value of 1. 
    2. Then, each time the code flow goes through a review of any level, either a principal or a reply comment (.comment-thread li), content will bring us in front (:before) of the body of the comment, the number that is the counter at the time.
    3. Then is incremented in one unit the counter (counter-increment).
    See the screenshot:
    count comments, comment bubble, forum, blogger

    Isnt that great? Well, im pretty sure many of you have been waiting for this cool trick. So lets begin applying it for our threaded comments system.

    Steps to add bubble comments count

    Step 1: Go to Dashboard - Template - Edit HTML (click on Proceed if needed)

      ...Expand Widget Templates:


      Step 2: Search (CTRL + F) for this piece of code:

      ]]></b:skin>

      Step 3: Add the following code just above it:

      .comment-thread ol {
      counter-reset: countcomments;
      }
      .comment-thread li:before {
      content: counter(countcomments,decimal);
      counter-increment: countcomments;
      float: right;
      z-index: 2;
      position:relative;
      font-size: 22px;
      color: #555555;
      padding-left:10px; 
      padding-top:3px; 
      background: url(
      https://blogger.googleusercontent.com/img/b/R29vZ2xl/AVvXsEgkYWPmLTZMazDh4ag340ACug_bTFitD9eAqKA3S1utBWOHgW8IGLnlNhzqj7_9467s_JCBb4SE3OLfs4zrmZ03BJgQMXq2Et4DTZ2H1J9VJDZxyM_SUGcxHMvA_F6lr6r8tQKAdx1dvbZH/s1600/comment+bubble2.png) no-repeat;
      margin-top:7px; 
      margin-left:10px; 
      width: 50px; /*image-width size*/
      height: 48px; /*image-height size*/ 

      }
      .comment-thread ol ol {
      counter-reset: contrebasse;
      }
      .comment-thread li li:before {
      content: counter(countcomments,decimal) "." counter(contrebasse,lower-latin);
      counter-increment: contrebasse;
      float: right;
      font-size: 18px;
      color: #666666;
      }

      Note:
      • for no bubble icon, remove the code in red (including the blue code)
      • to change the comment bubble, replace the code in blue with the URL address of your own icon. If youre not sure what icon you should use, you can find some cool icons in my previous posts (see these tutorials here and here)
      • to change the position of comments count, increase/decrease the values (3 & 10) from padding-top and padding-left
      • to change the position of comments bubble/icon, change the values (10 & 7) from margin-left and margin-top
      Step 4: Now Save the Template and youre done!

      If you enjoy reading this blog, please share and subscribe. For any questions, leave a comment below.
      Read More..