Ads 468x60px

Pages

Tampilkan postingan dengan label have. Tampilkan semua postingan

Minggu, 05 Januari 2014

Cannot have the same name of Javascript function on 3 differents pages!

Today I have spent 5 hours to find out the bug on my websites. My page structure is something like this : main page has 3 boxes - man, woman, animal. On the main page, I use jquery to fetch the information from man.php, woman.php, animal.php and display them onto the 3 boxes. Each of 3 pages (man.php, woman.php, animal.php) have a javascript function :
function showresponddiv(messagedivid){
        jQuery.get("showRespLive.php, function(data2) {
            $(#dialog .poptext).append(data2);
        });
};


The bug was when a user click on an information in the box of man by onclick="javascript:showresponddiv(this.id)", supposedly it should call the function showresponddiv() on man.php, but it fail to do so. It will call the function showresponddiv() on other page like woman.php or animal.php. Why? It is because I use jquery to show them 3 pages together into 1 main page. So actually the function showresponddiv() was declare 3 times on the main page.

To fix the bug, just change the name of the functions to showresponddiv2() and showresponddiv3().
Read More..

Rabu, 18 September 2013

How to Make the Blogger Posts Have a Calendar for the Date in

Its quite common to see calendar style dates next to some WordPress posts but for the Blogger platform it isnt always an very easy task to add this. But who said you cant do it? You need to look no further than this blog. In this tutorial, well learn how to create a calendar style date for your Blogger posts.


How to create calendar style dates in Blogger

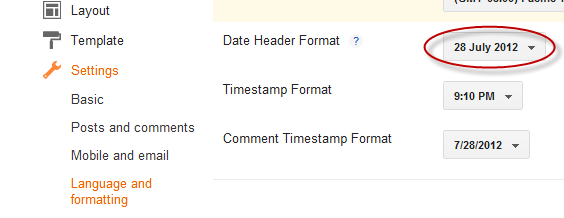
Step 1. Go to Settings > Language and Formatting - Date Header Format and change the date format as you can see in my example below (put day first, then the month and finally the year)
 

Step 2. Then go to Template > Edit HTML


Step 3. Select the "Expand Widget Templates" checkbox

Step 4. And search (CTRL + F) the following line:

<h2 class=date-header><span><data:post.dateHeader/></span></h2>

Step 5. In case you find it twice, then you should replace it twice with this code:

<div id=Date>
<script>changeDate(&#39;<data:post.dateHeader/>&#39;);</script>
</div>
<b:else/>
<div id=Date>
<script>changeDate(&#39;&#39;);</script>
</div>

Step 6. Now search for this tag (CTRL + F to find it)

</head>

Step 7. And paste the code from below just ABOVE the </head> tag:

<script type=text/javascript>
//<![CDATA[
var DateCalendar;
function changeDate(d){
if (d == "") {
d = DateCalendar;
}
var da = d.split( );
day = "<strong class=date_day>"+da[0]+"</strong>";
month = "<strong class=date_month>"+da[1].slice(0,3)+"</strong>";
year = "<strong class=date_year>"+da[2]+"</strong>";
document.write(month+day+year);
DateCalendar = d;
}
//]]>
</script>
<b:if cond=data:blog.pageType != &quot;static_page&quot;>
<style type=text/css>
/* Calendar style date
----------------------------------------------- */
#Date {
background: transparent url(https://blogger.googleusercontent.com/img/b/R29vZ2xl/AVvXsEhM7LD2yuO8-sKv-uAmVr4ygGojbsrxTQZRbLqdJJo9fluygXX5HZ67DKJhWP5VvOxIK8uSZG2QB8_sMfy5D7NAvmqIJgB4oiY42Vo5ujU2bTzYHEsBSEc832qzhV4N6HZZaJD0u6CD1q7J/s1600/calendar07.png) no-repeat;
display: block;
width:60px;
height:60px;
float: left;
margin: 15px 2px 0 -108px;
padding: 0 0 8px 0px;
border: 0;
text-transform: uppercase;
}
.date_month {
display: block;
font-size: 15px;
font-weight:bold;
margin-top:-1px;
text-align:center;
color:#ffffff; /* Months color */
}
.date_day {
display: block;
font-size: 28px;
font-weight:bold;
margin-top:-8px;
text-align:center;
color:#282828; /* Days color */
}
.date_year {
display: block;
font-size: 10px;
margin-top:-8px;
text-align:center;
color:#282828; /* Years color */
}
</style>
</b:if>


Before saving your Template, we can make some changes:
  • To change the calendar style, replace the url in blue with yours;
  • If the calendar doesnt appear correctly, change -108 with 0;
  • With green are marked the areas where you can change the color of the dates

Step 8. Now Preview your Template and if everything is ok, click on the Save button. Enjoy!
Read More..