Ads 468x60px

Pages

Tampilkan postingan dengan label date. Tampilkan semua postingan

Selasa, 24 September 2013

Style blogspot blogger date header

To change your blogs date header color and font style, you can do it with a very simple CSS adjustment that will make the date header to float on the left side of your post and to be partially out of the structure like a banner with a colorful appearance.
See the result in the image below:


How to do it

Step 1. Login into your Blogger Dashboard, select Template option > click on Edit HTML 


Step 2. Select Expand Blogger Template and search (CTRL + F) for the following code:

date.header

Or...

.date-header

Step 3. Add the following code snippet just below of it
background:white;
border-bottom: 1px solid #000000;
font-size:12px;
margin-left:-105px;
padding:3px 3px 3px 3px;
width:90px;
word-wrap:break-word;
float:left;
}

Putting it all together, it should look something like this:

.date-header span {
background:#FFD465;
border-bottom: 2px solid #cc0000;
color:#000000;
font-size:12px;
margin-left:-105px;
padding:3px 3px 3px 3px;
width:90px;
word-wrap:break-word;
float:left;}

To modify the style, replace the above bold/colored codes...

to change the background color:
to change the border style:
  • delete -bottom if you want border all around
  • change: 2px to a higher or lower value
  • change: solid with dotted if you want a dotted line
  • change:  #cc0000 with the hex code of border color

to change the font size and date color:
  • for a bigger text, change: 12px to a higher value
  • color: replace the hex code (#000000) with the hex of date color

Example:

color: #0000cc;

to change margin-left:
(represents the distance between date and blogger post)
  • replace -105px with a bigger/smaller value
float:

  • change left to right
Read More..

Jumat, 20 September 2013

Display post author date labels and comments with icons below post titles

When there are no comments made to your posts, theres a link that says Be the First to comment! and when there is just one comment it says 1 comment so far. If you want to make your blog more stylish by replacing these texts with some cute small icons along with the default Author Name, Post Date, Labels and Comments... then just follow the next steps:


Steps:
 
Step 1. From your Blogger Dashboard, click on the Template option, then press the Edit HTML button:


Step 2. Select the "Expand widgets templates" box


Step 3. Search for the below code (press the CTRL + F keys and paste the code in the search box):


<div class=post-header-line-1>

If you cant find the code above, look for this one:

    <div class=post-header>

Step 4. Paste the following code below/after the code above:

<font style=background:transparent url(https://blogger.googleusercontent.com/img/b/R29vZ2xl/AVvXsEibni4K6hf9jalTrpsctOB95N96L4vD84kShFA4iijEpNEz5wdf6iTd8u8sc8Zif3y4jXyBvST-UGrhcm3t0iLmoAEX1p8iQ4AYoyDRn8j8mnRozCjWtnQNQt3Ip1f1206xPhAvuhLEr-VT/s1600/author.gif) no-repeat scroll top left;padding-left:25px;font-size:11px;><data:post.author/></font> | <font style=background:transparent url(https://blogger.googleusercontent.com/img/b/R29vZ2xl/AVvXsEhEOX8qPRxdB-bJJa7Nj15gWkBLFqjS2bltsTIfxj_sG91dQIghuAN0CldP8qEQlIyIC8O4366-GwhuecYrCCcXkOdZsD_U6IbUj5JzwVgbON3ngcelTGAKkArEdVetRVZnLL_OWMkJVJ1l/s1600/clock_icon.gif) no-repeat scroll top left;padding-left:25px;font-size:11px;><data:post.timestamp/></font> | <font style=background:transparent url(https://blogger.googleusercontent.com/img/b/R29vZ2xl/AVvXsEhjsWSje38aM7O8whHWD5cFgN8uV2bIORF7ySQw4VndJ4NFvZPOf7whpw4iF9mwZDlFaVoEF6i_PKk8xzUc04fsexTAOGvjuscqOAENlcEGcLF8cYCx5TndJ7OJnnhd1QkOiHnBH-ixHsGb/s1600/tag+icon.gif) no-repeat scroll top left;padding-left:25px;font-size:11px;><b:if cond=data:post.labels>
<b:loop values=data:post.labels var=label>
<a expr:href=data:label.url + &quot;?max-results=8&quot; rel=tag><data:label.name/></a>
<b:if cond=data:label.isLast != &quot;true&quot;>|</b:if>
</b:loop>
</b:if></font>
<span class=post-comment-link style=Float:right;>
        <b:if cond=data:blog.pageType != &quot;item&quot;>
          <b:if cond=data:post.allowComments>
            <a class=comment-link expr:href=data:post.addCommentUrl expr:onclick=data:post.addCommentOnclick style=background:url(https://blogger.googleusercontent.com/img/b/R29vZ2xl/AVvXsEhPTeKPl10dph3Q0JzhsbhXXa9AwFfC4kqUWXNfq_8qsncdTmOOrqQLG89oIOPBxGrMcHoGEDpeV_GWNGZ4P14mQCVMw5GzneIro0tMQkDroNlMjxv6-xY65UvxPr0duvXur5VICQOuXcu4/s1600/comment-icon.png) no-repeat;Padding-left:20px;><b:if cond=data:post.numComments == 0>Be the first to comment!<b:else/> <b:if cond=data:post.numComments == 1><data:post.numComments/> Comment so far<b:else/><data:post.numComments/> Comments so far</b:if> </b:if></a>
          </b:if>
        </b:if>
      </span>

How to customize:

If you want to change the icons, just replace the URL addresses above colored with:

  • Red - Author
  • Green - Date
  • Blue - Labels
  • Violet - Comment bubble

... with the URL address of your image.

Step 5. Save template... and youre done!
Read More..

Rabu, 18 September 2013

How to Make the Blogger Posts Have a Calendar for the Date in

Its quite common to see calendar style dates next to some WordPress posts but for the Blogger platform it isnt always an very easy task to add this. But who said you cant do it? You need to look no further than this blog. In this tutorial, well learn how to create a calendar style date for your Blogger posts.


How to create calendar style dates in Blogger

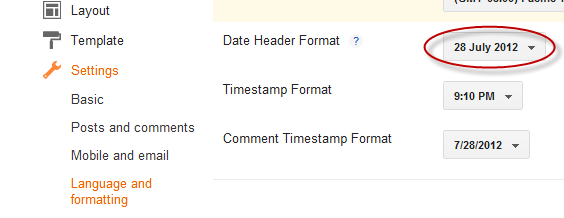
Step 1. Go to Settings > Language and Formatting - Date Header Format and change the date format as you can see in my example below (put day first, then the month and finally the year)
 

Step 2. Then go to Template > Edit HTML


Step 3. Select the "Expand Widget Templates" checkbox

Step 4. And search (CTRL + F) the following line:

<h2 class=date-header><span><data:post.dateHeader/></span></h2>

Step 5. In case you find it twice, then you should replace it twice with this code:

<div id=Date>
<script>changeDate(&#39;<data:post.dateHeader/>&#39;);</script>
</div>
<b:else/>
<div id=Date>
<script>changeDate(&#39;&#39;);</script>
</div>

Step 6. Now search for this tag (CTRL + F to find it)

</head>

Step 7. And paste the code from below just ABOVE the </head> tag:

<script type=text/javascript>
//<![CDATA[
var DateCalendar;
function changeDate(d){
if (d == "") {
d = DateCalendar;
}
var da = d.split( );
day = "<strong class=date_day>"+da[0]+"</strong>";
month = "<strong class=date_month>"+da[1].slice(0,3)+"</strong>";
year = "<strong class=date_year>"+da[2]+"</strong>";
document.write(month+day+year);
DateCalendar = d;
}
//]]>
</script>
<b:if cond=data:blog.pageType != &quot;static_page&quot;>
<style type=text/css>
/* Calendar style date
----------------------------------------------- */
#Date {
background: transparent url(https://blogger.googleusercontent.com/img/b/R29vZ2xl/AVvXsEhM7LD2yuO8-sKv-uAmVr4ygGojbsrxTQZRbLqdJJo9fluygXX5HZ67DKJhWP5VvOxIK8uSZG2QB8_sMfy5D7NAvmqIJgB4oiY42Vo5ujU2bTzYHEsBSEc832qzhV4N6HZZaJD0u6CD1q7J/s1600/calendar07.png) no-repeat;
display: block;
width:60px;
height:60px;
float: left;
margin: 15px 2px 0 -108px;
padding: 0 0 8px 0px;
border: 0;
text-transform: uppercase;
}
.date_month {
display: block;
font-size: 15px;
font-weight:bold;
margin-top:-1px;
text-align:center;
color:#ffffff; /* Months color */
}
.date_day {
display: block;
font-size: 28px;
font-weight:bold;
margin-top:-8px;
text-align:center;
color:#282828; /* Days color */
}
.date_year {
display: block;
font-size: 10px;
margin-top:-8px;
text-align:center;
color:#282828; /* Years color */
}
</style>
</b:if>


Before saving your Template, we can make some changes:
  • To change the calendar style, replace the url in blue with yours;
  • If the calendar doesnt appear correctly, change -108 with 0;
  • With green are marked the areas where you can change the color of the dates

Step 8. Now Preview your Template and if everything is ok, click on the Save button. Enjoy!
Read More..