Ads 468x60px

Pages

Tampilkan postingan dengan label customize. Tampilkan semua postingan

Jumat, 04 Oktober 2013

How to Customize Bloggers Lightbox

Now, for those of you who have chosen to use the Bloggers Lightbox View to display the images, you have the option to change its style in a whole different way. Well be able to change the black color of the screen, the border or shadow of the images and the color of the thumbnails background as well. We can customize the Blogger Lightbox entirely on your taste.

blogger lightbox, change blogger lightbox
Demo

Take a look at the screenshots below:

Before:

customize blogger lightbox, blogger lightbox

After:

blogger lightbox, change lightbox background

After adding our CSS code, the entire look of the modal window will be changed: the background color, the bar showing the thumbnails, the edge of images (border), the text that appears in it, transparency and the close button.

blogger lightbox, modify lightbox, blogger tutorials

All we have to do is to overwrite the default styles and change them for ours.

How to Change the Bloggers Lightbox Background and Style

Step 1. Go to Template, click on the Edit HTML button (also click on the Proceed button if needed)


Step 2. Search using CTRL + F the following code snippet:

]]></b:skin>

Step 3. Copy and paste the following code just above it:

/* Blogger Lightbox
----------------------------------------------- */

/* Background Color */
.CSS_LIGHTBOX_BG_MASK {
background-color: #ffffff !important;
background-image: url(image-url-address) !important;
opacity: 0.8 !important;
filter: alpha(opacity=90) !important;
}

/* Images Border */
.CSS_LIGHTBOX_SCALED_IMAGE_IMG {
outline: 0px solid #fff !important;
-webkit-border-radius: 10px;
-moz-border-radius: 10px;
border-radius: 10px;
-webkit-box-shadow: 0px 0px 5px #000000;
-moz-box-shadow: 0px 0px 5px #000000;
box-shadow: 0px 0px 5px #000000;
}

/* Close Button */
.CSS_LIGHTBOX_BTN_CLOSE {
background: url(image-url-address) no-repeat !important;
width: 24px !important;
height: 24px !important;
}

/* Thumbnails Bar Color */
.CSS_LIGHTBOX_FILMSTRIP {
background-color: #eaeaea !important;
}

/* Text Color */
.CSS_LIGHTBOX_ATTRIBUTION_INFO, .CSS_LIGHTBOX_ATTRIBUTION_LINK {
color: #000 !important;
}

/* Index Info (number of images) */
.CSS_LIGHTBOX_INDEX_INFO {
color: #555555 !important;
}

Note:

- The text in green explains to which part the code belongs (it doesnt need to be modified)

For example, the / * Background Color * / part can change the background color or even the LightBox background color to an image. If you want to do that, then change this line by replacing the red text with the url address of your image:

background-image: url(image-url-address) !important;

- The opacity is just below, if you add a lower value ( 0.8 ) the background will become more transparent.

- To change the icon for close button, you have to replace the text in red from /* Close Button */ with the url of your image. (you can host image at tinypic or upload it into a blogger draft and then Copy the Link Location)

- To change the text color of images, replace the #555555 value from /* Index Info (number of images) */

- The border of the images can be changed as much as we want: you can change the borders roundedness, shadow, etc... but remember this is CSS3 so older versions of Internet Explorer will not see it.

Step 4. Click on Save Template and youre done!
Read More..

Rabu, 18 September 2013

Amazing Examples To Customize Blockquote Style In Blogger Blogspot

Add awesome designs, backgrounds and CSS3 effects for displaying HTML, CSS and other codes in blogger posts using CSS and CSS3. Just follow these steps:

Step 1. Go to design > Edit HTML > check the "Expand widget templates" box

Step 2. Search for this piece of code:

</head>

Step 3. Just above it, paste the following code:

<link href=http://helplogger.googlecode.com/svn/trunk/css/blockquotes/styles.css rel=stylesheet type=text/css/>

Step 4. Save the Template

Now everytime you create a post, switch to Edit HTML tab, choose the syle you like and add the red codes below to the beginning and end of the text you want to quote. See the screenshot below:


Here are the available designs:

Example 1:

Lorem ipsum dolor sit amet, consectetuer adipiscing elit, sed diam nonummy nibh euismod tincidunt ut laoreet dolore magna aliquam erat volutpat. Ut wisi enim ad minim veniam, quis nostrud exerci tation ullamcorper suscipit lobortis nisl ut aliquip ex ea commodo consequat. Duis autem vel eum iriure dolor in hendrerit in vulputate velit esse molestie consequat, vel illum dolore eu feugiat nulla facilisis at vero eros et accumsan et iusto odio dignissim qui blandit praesent luptatum zzril delenit augue duis dolore te feugait nulla facilisi. Nam liber tempor cum soluta nobis eleifend option congue nihil imperdiet doming id quod mazim placerat facer possim assum.

<div class="code1"> YOUR TEXT HERE </div>

Example 2

Lorem ipsum dolor sit amet, consectetuer adipiscing elit, sed diam nonummy nibh euismod tincidunt ut laoreet dolore magna aliquam erat volutpat. Ut wisi enim ad minim veniam, quis nostrud exerci tation ullamcorper suscipit lobortis nisl ut aliquip ex ea commodo consequat. Duis autem vel eum iriure dolor in hendrerit in vulputate velit esse molestie consequat, vel illum dolore eu feugiat nulla facilisis at vero eros et accumsan et iusto odio dignissim qui blandit praesent luptatum zzril delenit augue duis dolore te feugait nulla facilisi. Nam liber tempor cum soluta nobis eleifend option congue nihil imperdiet doming id quod mazim placerat facer possim assum.

<div class="code2"> YOUR TEXT HERE </div>

Example 3:

Lorem ipsum dolor sit amet, consectetuer adipiscing elit, sed diam nonummy nibh euismod tincidunt ut laoreet dolore magna aliquam erat volutpat. Ut wisi enim ad minim veniam, quis nostrud exerci tation ullamcorper suscipit lobortis nisl ut aliquip ex ea commodo consequat. Duis autem vel eum iriure dolor in hendrerit in vulputate velit esse molestie consequat, vel illum dolore eu feugiat nulla facilisis at vero eros et accumsan et iusto odio dignissim qui blandit praesent luptatum zzril delenit augue duis dolore te feugait nulla facilisi. Nam liber tempor cum soluta nobis eleifend option congue nihil imperdiet doming id quod mazim placerat facer possim assum.

<div class="code3"> YOUR TEXT HERE </div>

Example 4:

Lorem ipsum dolor sit amet, consectetuer adipiscing elit, sed diam nonummy nibh euismod tincidunt ut laoreet dolore magna aliquam erat volutpat. Ut wisi enim ad minim veniam, quis nostrud exerci tation ullamcorper suscipit lobortis nisl ut aliquip ex ea commodo consequat. Duis autem vel eum iriure dolor in hendrerit in vulputate velit esse molestie consequat, vel illum dolore eu feugiat nulla facilisis at vero eros et accumsan et iusto odio dignissim qui blandit praesent luptatum zzril delenit augue duis dolore te feugait nulla facilisi. Nam liber tempor cum soluta nobis eleifend option congue nihil imperdiet doming id quod mazim placerat facer possim assum.

<div class="code4"> YOUR TEXT HERE </div>

Example 5:

Lorem ipsum dolor sit amet, consectetuer adipiscing elit, sed diam nonummy nibh euismod tincidunt ut laoreet dolore magna aliquam erat volutpat. Ut wisi enim ad minim veniam, quis nostrud exerci tation ullamcorper suscipit lobortis nisl ut aliquip ex ea commodo consequat. Duis autem vel eum iriure dolor in hendrerit in vulputate velit esse molestie consequat, vel illum dolore eu feugiat nulla facilisis at vero eros et accumsan et iusto odio dignissim qui blandit praesent luptatum zzril delenit augue duis dolore te feugait nulla facilisi. Nam liber tempor cum soluta nobis eleifend option congue nihil imperdiet doming id quod mazim placerat facer possim assum.

<div class="code5"><div class="code-5"> YOUR TEXT HERE </div></div>

Example 6


Lorem ipsum dolor sit amet, consectetuer adipiscing elit, sed diam nonummy nibh euismod tincidunt ut laoreet dolore magna aliquam erat volutpat. Ut wisi enim ad minim veniam, quis nostrud exerci tation ullamcorper suscipit lobortis nisl ut aliquip ex ea commodo consequat. Duis autem vel eum iriure dolor in hendrerit in vulputate velit esse molestie consequat, vel illum dolore eu feugiat nulla facilisis at vero eros et accumsan et iusto odio dignissim qui blandit praesent luptatum zzril delenit augue duis dolore te feugait nulla facilisi.

<div class="code6"> YOUR TEXT HERE </div>


Enjoy!
Read More..

Sabtu, 07 September 2013

How to Customize Blogger Comments By Adding a Background Color and Border

The comments are an essential part of a blog because in them is reflected the readers opinions regarding a post or our blog, so it is important to spend a little of our time to make this part looking more presentable, accessible and neat.

To set in order our comments, it is necessary to make each comment easy to identify, therefore to know from where it begins and to where it ends, otherwise it becomes a jumble of letters of which the reader can run away. Here are some ways to make some order by separating each comment.

- Add a Separator To Blogger Comments
- Add a Divider Below Comments in Blogger
- Fully Customize Your Blogger Comments By Changing The Background Color and Border

The first method is the easiest, and is about how to put a border below our comments, this is to separate each blog comment in a simple but effective way.

How to Add a Separator/Border To Blogger Comments

customize comments, blogger

Step 1. To add a simple separator go to Template > Edit HTML and click on the small arrow on the left of <b:skin>...</b:skin>
Step 2. Click anywhere inside the code area and search using CTRL + F keys, for the following piece of code:
]]></b:skin>

Step 3. Paste the following style just above it:

- If we are using threaded comments (with the reply option):

.comment-block {
border-bottom: 1px solid #000000;
}

.comments .continue {
  border-top: 0px solid $(widget.alternate.text.color);
}

- If we are using previous commenting system (with no reply option)

#comments-block .comment-footer {
border-bottom:1px solid #000000;
}

Note: To change the borders color, replace the bolded color value and to change its thickness, increase/decrease the 1 value.

Step 4. Save the Template.

Instead of a simple border, we can also add a divider/image between our comments.

How to Add a Divider (Image) Between Each Comment in Blogger

blogger comments, blogger tricks, blogger tutorials

Step 1. Go to Template > Edit HTML and search (CTRL + F) for the following piece of code:
]]></b:skin>
Screenshot:


Step 2. Paste the following just above it:

- If we are using threaded comments (with the reply option):
.comment-block {
background-image:url(https://blogger.googleusercontent.com/img/b/R29vZ2xl/AVvXsEhpuRPyiCv8M4ZdxLaVH4zOU1vAhtdjvC_Rf76uheg57D8jiDG5RdUFH5Iz7gvZoRfanoqdCg2TctTWI_SexQDWGAcsJjtZcBkglAlQbEiSsGaQHtRMVpW7zGCHKTDYYTu3fPosjAMVYlJQ/s1600/74.gif);
background-repeat:no-repeat;
background-position:center bottom;
padding-bottom:30px;
margin-top: -10px;
}

.comments .continue {
border-top: 0px solid $(widget.alternate.text.color);
}

- If we are using previous commenting system (with no reply function)
#comments-block .comment-footer {
background-image:url(https://blogger.googleusercontent.com/img/b/R29vZ2xl/AVvXsEhpuRPyiCv8M4ZdxLaVH4zOU1vAhtdjvC_Rf76uheg57D8jiDG5RdUFH5Iz7gvZoRfanoqdCg2TctTWI_SexQDWGAcsJjtZcBkglAlQbEiSsGaQHtRMVpW7zGCHKTDYYTu3fPosjAMVYlJQ/s1600/74.gif);
background-repeat:no-repeat;
background-position:center bottom;
height: 50px;
}

Note: The URL that is in blue represents the image that you can change as you like, just remember that at the height must set the height of an image with 30px more, for instance, if the images height is 50px then the value will be 80px. This is for making sure that the image wont overlap the date of comments. (for threaded comments, increase/decrease the padding 30 value)

Step 3. Save the Template.

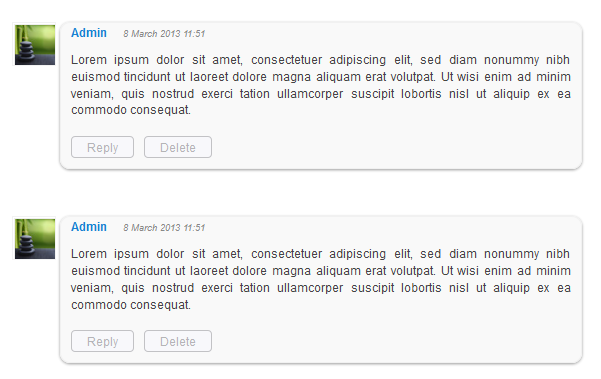
But you can still have more styles for each comment, for example adding a background color and a border.

How to Add A Border and A Background Color To Blogger Comments

blogger tips, blogger tricks, gadgets
Step 1. Go to Template > Edit HTML and search for the following piece of code:
]]></b:skin>

Step 2. Paste the following just above it:

- If we are using threaded comments (with the reply option):
.comment-block {
background:#F9F9F9; /* Background Color */
border: 1px solid #f1f1f1; /* Border style */
margin-bottom:20px;
-webkit-box-shadow: 0 1px 2px rgba(0, 0, 0, .4);
-moz-box-shadow: 0 1px 2px rgba(0, 0, 0, .4);
box-shadow: 0 1px 2px rgba(0, 0, 0, .4);
-moz-border-radius: 10px;
-webkit-border-radius: 10px;
border-radius: 10px;
}

.comments .comment-thread.inline-thread {
background-color: #FAFAFA; /* Background color behind the replies */
border-left: 4px dotted #E6E6E6; /* Border on the left side of replies */
}

.comment-content {
padding:2px 10px 10px 10px;
color:#444444; /* Font Color in Comments */
}

.datetime a {
font-style:italic;
font-size:9px;
margin-left: 2px;
}

.comments .comments-content .user a{
color:#1982D1; /* Authors name color */
font-size: 12px; /* Authors name size */
padding-left: 10px;
font-weight:bold;
text-decoration:none;
}

.comments .comment .comment-actions a,.comments .comment .continue a{
display:inline-block;
margin:0 0 10px 10px;
padding:0 15px;
color:#B4B4B7;
text-align:center;
text-decoration:none;
background:#F8F8FB;
border:1px solid #C2C2C5;
border-radius:4px;
height:20px;
line-height:20px;
font-weight:normal;
cursor:pointer;
}

.comments .continue {
border-top: 0px solid $(widget.alternate.text.color);
}

.comments .comments-content .icon.blog-author {
background-image: none;
margin-left: -10px;
}

.comments .avatar-image-container{
margin: 0px 0px 0px 0px;
padding: 0px 0px 0px 0px;
width: 40px;
max-height: 40px;
border: 1px solid #F2F2F2;
padding: 1px;
}

.comments .avatar-image-container img{
margin: 0px 0px 0px 0px;
padding: 0px 0px 0px 0px;
max-width: 40px;
height: 40px;
}

Step 3. Save the Template.

- If we are using previous commenting system (with no reply function):

Step 1. Search for this line in your template:
<b:loop values=data:post.comments var=comment>

Step 2. Then, add the following code just below of it:
<div class=comments-ct>

Step 3. Look a little further down and youll see the </b:loop> code and just above it, add this:
</div>

Step 4. Now find this:
]]></b:skin>

Step 5. And just above of it, add this CSS code:
.comments-ct{
background:#F9F9F9; /* Background Color */
border: 1px solid #f1f1f1; /* Bprder Style */
margin-bottom:20px;
-webkit-box-shadow: 0 1px 2px rgba(0, 0, 0, .4);
-moz-box-shadow: 0 1px 2px rgba(0, 0, 0, .4);
box-shadow: 0 1px 2px rgba(0, 0, 0, .4);
-moz-border-radius: 10px;
-webkit-border-radius: 10px;
border-radius: 10px;
}

.comment-body {
color:#444444; /* Font Color in Comments */
padding:10px;
}

.comments-ct a {
padding-left: 5px; /* Link color */
color: #4A9BD8;
}

.comment-timestamp a {
font-style:italic;
font-size:9px;
padding-right:10px;
padding-left:10px;
}
(The rounded edges will not work in Internet Explorer with CSS)

In either case, you can change the background color, border, etc.. in parts with annotations in green.

Step 6. Save the Template.

If you need more help, leave a comment below.
Read More..